Ubiquiti UniFi Cloud Controller
This article describes the installation and configuration steps for Ubiquiti UniFi Cloud Controller in Legacy mode. Instructions in this guide is only for older UniFi controllers which have Legacy mode and shouldn’t be used for new setups. Our test was performed with Unifi controller 6.4.54 and Unifi AP-AC-Lite firmware version 6.6.55.1589
(the previous tests were performed with controllers v5.9.29, v5.10.23.11668-1, v5.11.50, v5.13.32, v5.14.23.0 and Unifi AP-AC-Lite firmware v4.0.54.10625, v4.0.9.9639, v6.5.28.14491. Some Unifi controller versions don’t work (like 6.0.45.0) so please use v 6.4.54)
Connecting
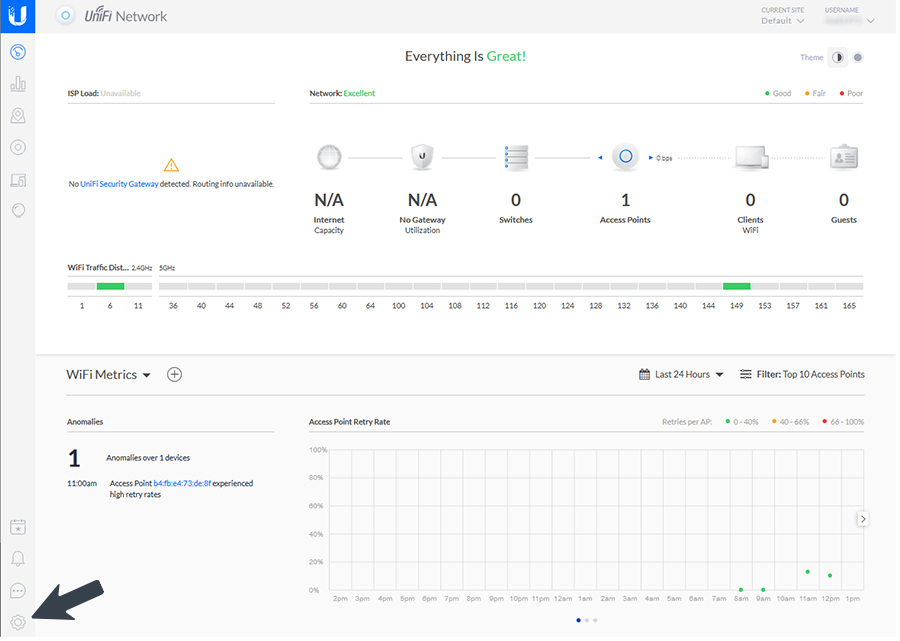
Log in to your UniFi controller and click the Setting icon.
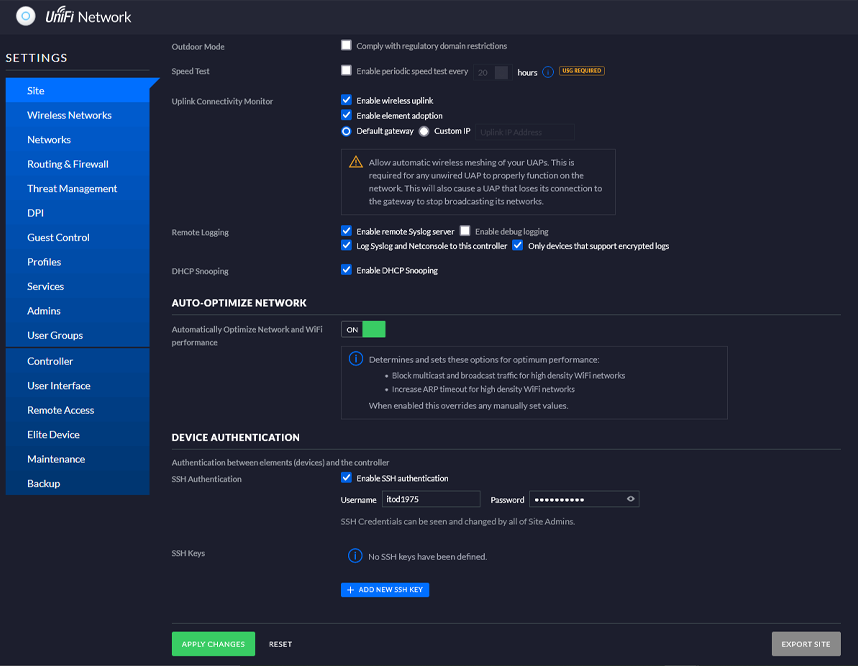
Go to the Site page and click Apply changes.
Create a Wireless Network that will be enabled for Guest Access.

Go to Settings / Wireless Networks, click Create New Wireless Network and configure following:
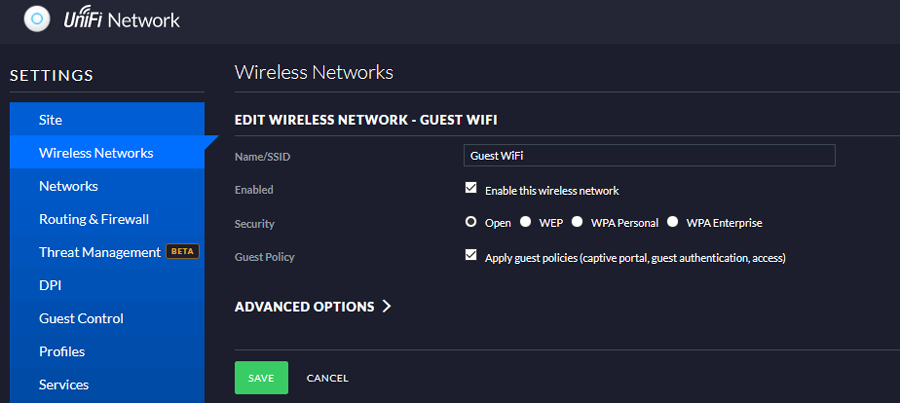
Name/SSID: Your SSID ( it’s your choice what will be set as SSID Name, Guest WiFi in our case)
Enabled: Enabled
Security: Open
Guest Policy: Enabled
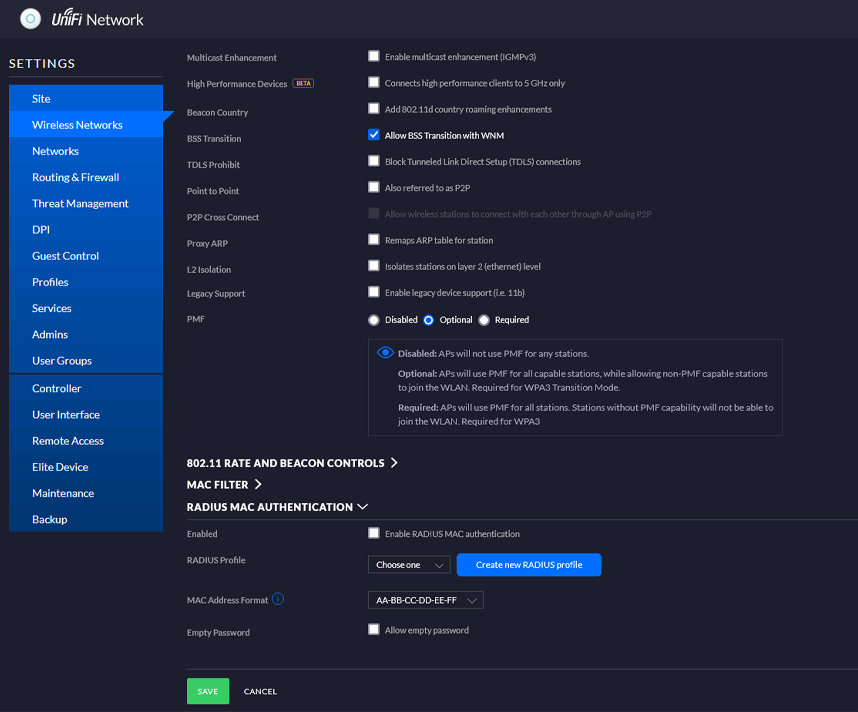
Click Advanced Options and from the Radius MAC Authentication section, change the MAC Address format to AA-BB-CC-DD-EE-FF and save changes.
Go to Guest Control page and on the Guest Policies section set following:
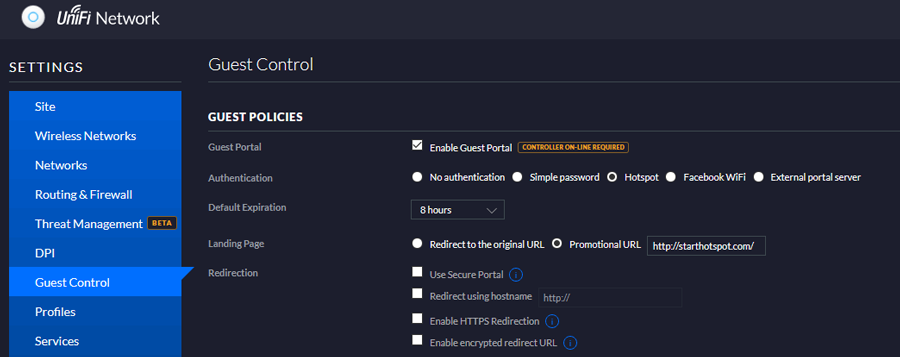
Enable Guest Portal: Enabled
Authentication: Hotspot
Default Expiration: 8 Hours
Landing Page: Promotion URL – insert desired URL
Use Secure Portal: Disabled
Redirect using hostname: Disabled
Enable HTTPS Redirection: Disabled
Enable encrypted redirect URL: Disabled
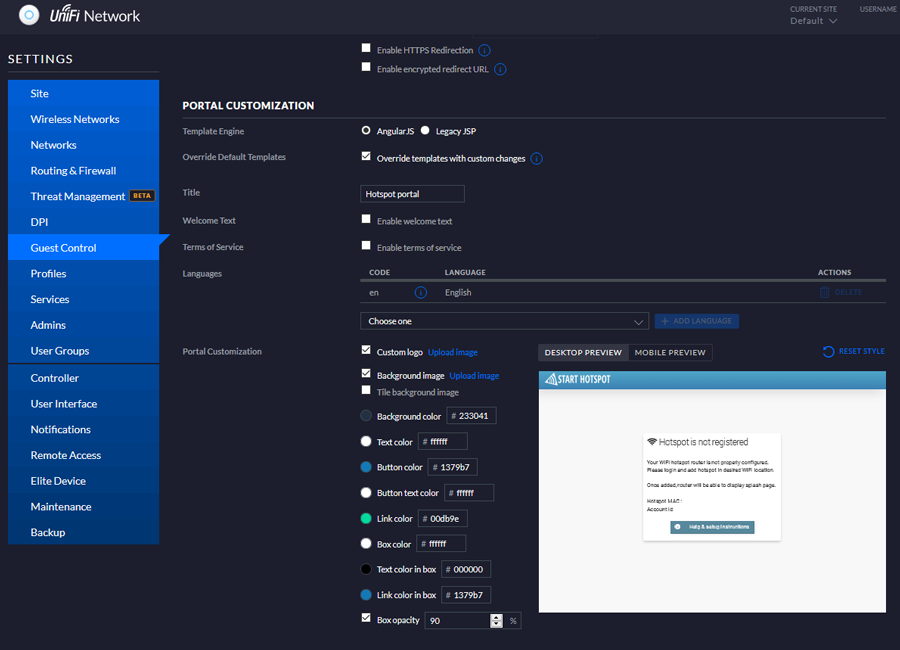
On the Portal Customization section as Template Engine set Angular JS and enable Override Default Templates.
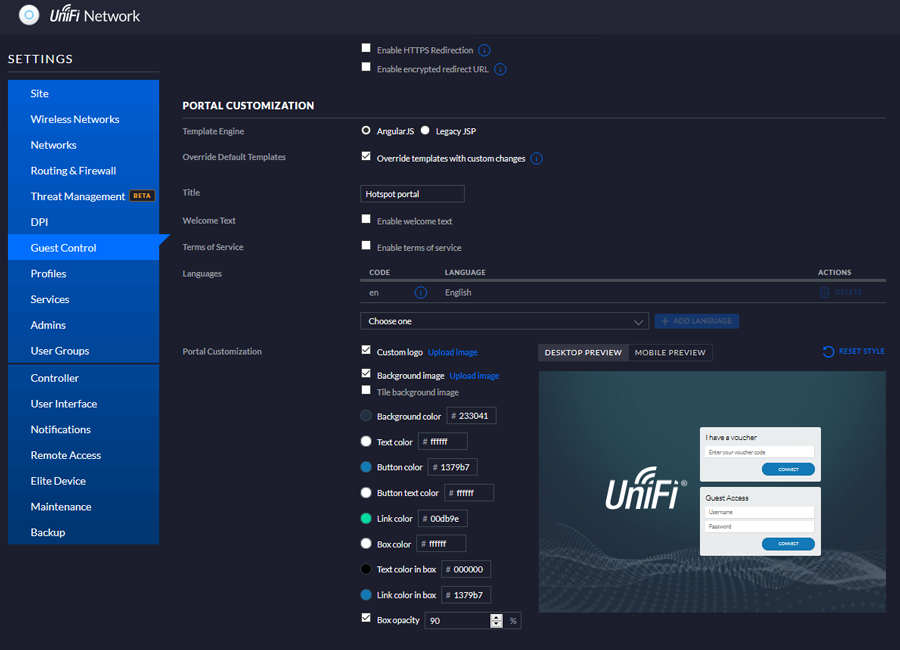
Later, when you change index.html and auth.html files Desktop preview will change to:
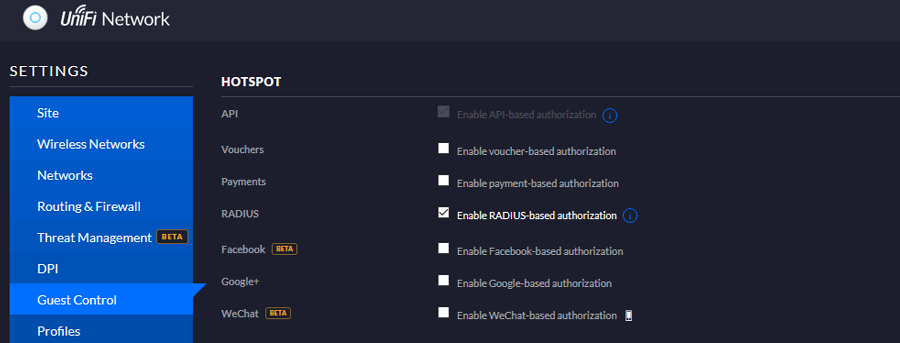
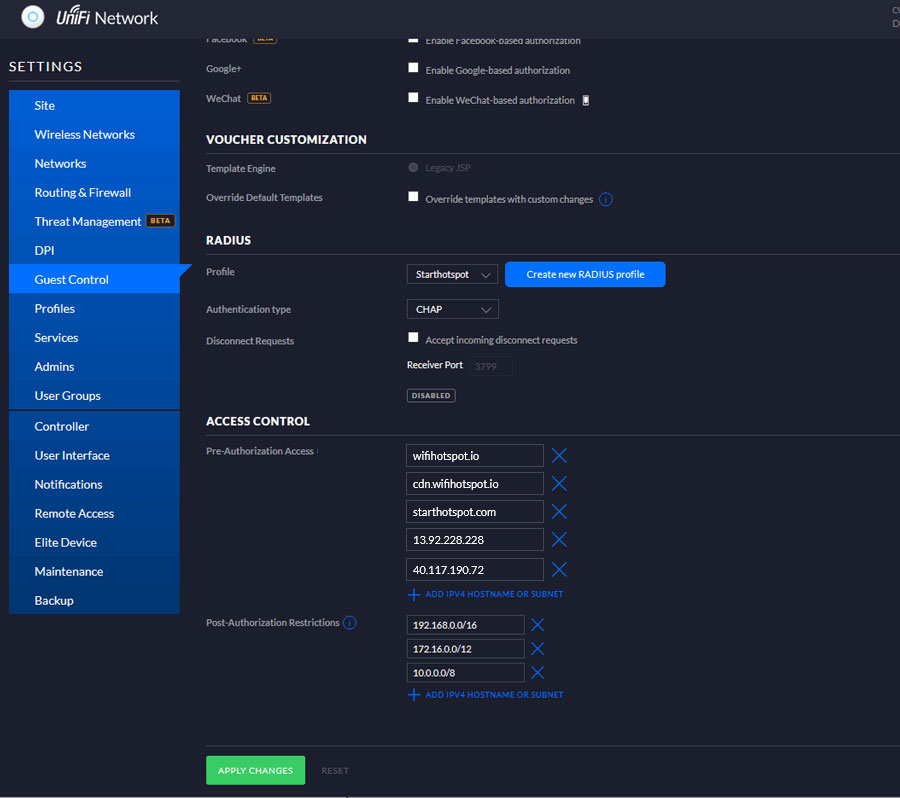
In the Hotspot section enable Radius-based authorization
Override Default Template should be disabled in the Voucher Customization section.
On the RADIUS section under Profile click Create new RADIUS profile button or select the previously created RADIUS Profile and configure the following:
As Authentication type select CHAP.
Accept incoming disconnect request: DISABLED
( check the Configuring parameters section to learn how to create a new Radius profile)
On the Access Control / Pre-Authorization section enter the Walled garden IP’s.
antamedia.net
app.antamedia.net
app.antamedia.com
wifihotspot.io
static.cloudflareinsights.com
13.92.228.228
109.245.64.94
91.150.99.187
ocsp.sectigo.com
ocsp.usertrust.com
ocsp.comodoca.com
crl.sectigo.com
crl.usertrust.com
crl.comodoca.com
crt.sectigo.com
crt.usertrust.com
crt.comodoca.com
apple.com
sectigo.com
usertrust.com
Configuring parameters
Go to the ProfilesRadius section and click the Create new RADIUS profile button.
Click Create New RADIUS Profile and configure the following:
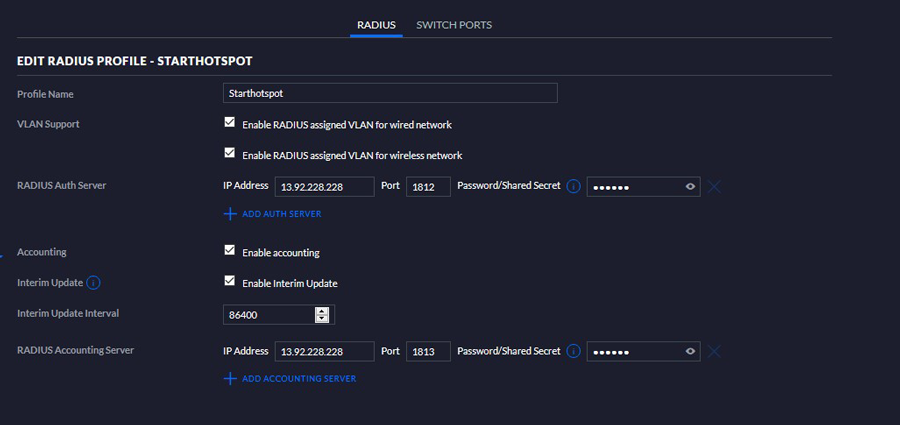
Profile Name: Starthotspot
Americas Servers:
RADIUS Auth Server: 13.92.228.228
Port: 1812
Password / Shared secret: (contact our office)
RADIUS Account Server: 13.92.228.228
Port: 1813
Password / Shared secret: (contact our office)
Interim update: Enabled
Interim update interval: 86400
Europe & Global Servers:
RADIUS Server: 109.245.64.94
Authentication port: 1812
Accounting port: 1813
Save changes.
If you want to enable Social network login feature or use Paypal as payment gateway, add further IP’s as per below for each network you plan to support.
Important: These IP ranges are subject to change depending on the social network setup.
31.13.24.0/21
www.facebook.com
staticxx.facebook.com
connect.facebook.net
static.xx.fbcdn.net
157.240.0.0/16
31.13.0.0/16
– if it does not work, try adding:
45.64.40.0/22
66.220.144.0/20
69.63.176.0/20
69.171.224.0/19
74.119.76.0/22
103.4.96.0/22
129.134.0.0/16
173.252.64.0/18
179.60.192.0/22
185.60.216.0/22
204.15.20.0/22
199.16.156.0/22
199.59.148.0/22
199.96.56.0/21
192.133.76.0/22
91.225.248.0/23
www.linkedin.com
static.licdn.com
184.51.0.0/16
108.174.0.0/16
– if it does not work, try adding:
103.20.94.0/23
108.174.0.0/22
108.174.4.0/24
108.174.8.0/22
108.174.12.0/23
144.2.0.0/22
144.2.192.0/24
216.52.16.0/23
216.52.18.0/24
216.52.20.0/23
216.52.22.0/24
65.156.227.0/24
8.39.53.0/24
185.63.144.0/24
185.63.147.0/24
199.101.161.0/24
64.152.25.0/24
8.22.161.0/24
paypal.com
sandbox.paypal.com
paypalobjects.com
paypalssl.doubleclick.net
paypal.112.2o7.net
securepics.ebaystatic.com
mobile.paypal.com
m.paypal.com
Facebook app setup instructions
Twitter app setup instructions
LinkedIn app setup instructions
Apply changes to save.
At the end, you will need to modify two html files on the controller so that it correctly redirects and authenticates.
Last, very important step:
Download this file and unzip contents (index.html and auth.html) it in your app-unifi-hotspot-portal directory
Depending of the OS, it is usually located at the location bellow:
Windows: C:\Users\\Ubiquiti UniFi\data\sites\default\app-unifi-hotspot-portal
MAC: ~/Library/Application Support/UniFi/data/sites/default/app-unifi-hotspot-portal
Linux: /usr/lib/unifi/data/sites/default/app-unifi-hotspot-portal
UDM Pro: /data/unifi/data/sites/default/app-unifi-hotspot-portal
If you are using Cloud key, please upload our index and auth files into appropriate site folder. By default it’s:
/srv/unifi/data/sites/default/app-unifi-hotspot-portal
Troubleshooting
Having troubles? Here is a quick check list:
1. Make sure that you selected CHAP and not MS-CHAP
2. Make sure that you replaced index and auth files.
– If it’s local controller installation files are on your computer. See paths above.
– If it’s Cloud Key installation, upload these files into appropriate folder
– If it’s Hostifi, send your files to the admin to replace original ones.
3. Make sure that you typed AP MAC address into our cloud portal
4. If the mobile you are testing is not reaching our Hotspot splash page, but instead you get ERR_CONNECTION_REFUSED with address like http://yourpublicip:8880/guest/s/…. please make sure that your AP can reach machine where controller is being hosted. If it’s your personal computer, do a port forwarding, unblock firewall etc…
5. Make sure to match exact model of your AP. In some cases mistakes are not obvious, for example:
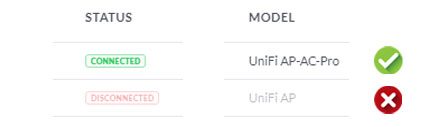
6. Client MAC is not received
If you are getting the splash page, but can not login and receive “Invalid password” or other errors, please check if the AP is sending client MAC address.
Some versions of Unifi AP firmware are buggy and do not send client MAC.
In such a case, downgrade AP firmware to the earlier version.
At the time of writing, downgrade from v4.3.20 to v4.0.54 resolved the issue.

If your attempts to downgrade via web links (SSH or Unifi Controller) continuously fail, please do it this way: SCP into the AP, copy the firmware file to /tmp, then SSH in and run command.
7. Make sure that you configured Ubiquity AP (Unifi Controller) when you deploy APs with the controller.
8. If you get a URL similar to this one on the client device ( IP address instead wifihotspot.io domain)
http://192.168.1.7:8880/guest/s/default/?ap=b4:hg:04:73:de:8f&id=01:37:10:98:12:44&t=1597065764&url=http://www.msftconnecttest.com%2fredirect&ssid=UnifiGuest
it means that the controller isn’t started or there are no communications between the controller and APs.
9. SSID name should contain only letters and numbers—don’t use spaces or special characters, such as !, @, #, $, ?, *, ‘,-, etc.
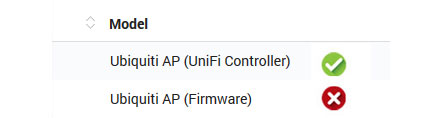
10. If you get the message WiFiAccessDenied WelcomePage.FailedInternal
make sure that as a Hotspot Model for all APs on the WiFi location you have selected Ubiquiti AP (Unifi Controller) not Ubiquiti AP (Firmware).
Note that Ubiquiti Unifi doesn’t control bandwidth data limit transfer. Ubiquiti Unifi allows control only of the session time but it doesn’t control bandwidth quota limits.