
SMS Campaign
SMS Campaigns allow you to send text messages to WiFi customers who provided a mobile phone number and are eligible to receive your communications.
You can create personalized SMS messages, target customers by WiFi location, send a test message, and send the campaign immediately or schedule it for later.
Configure the SMS Gateway
Before creating an SMS campaign, configure the SMS service under:
My Account → SMS
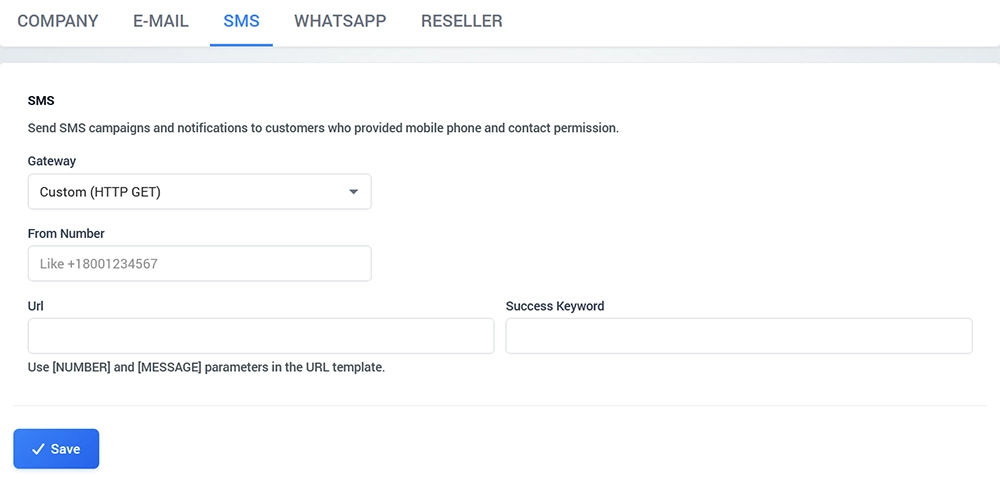
Enter the settings required by your SMS provider and save the configuration.
The exact gateway parameters depend on the SMS service you use. WiFi Hotspot also supports custom HTTP GET integration for compatible SMS providers.
Test the SMS gateway before sending a campaign to customers.
Create an SMS Campaign
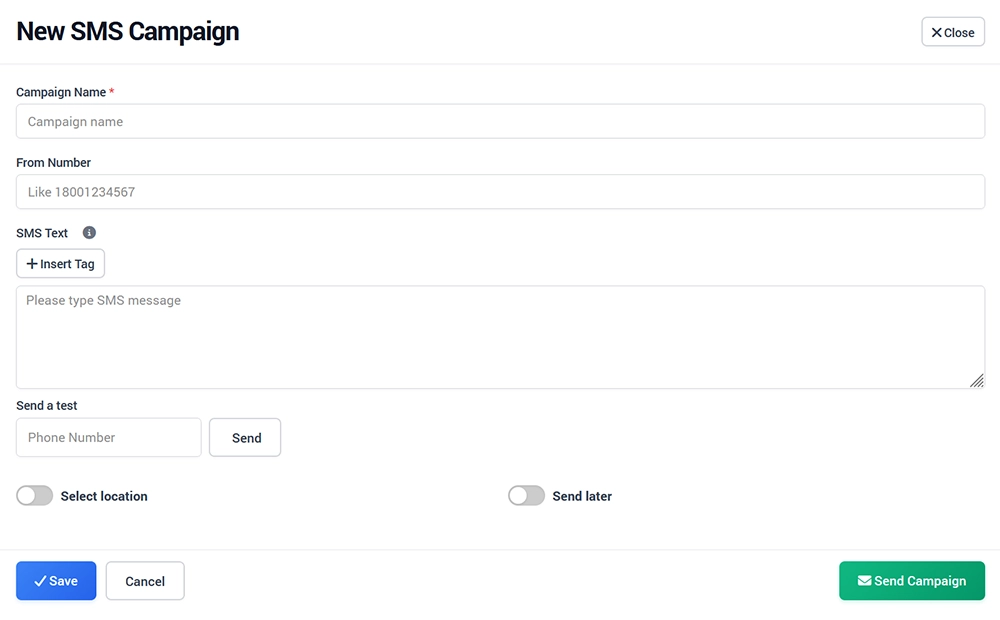
Open:
WiFi Marketing → SMS Campaigns
and click New SMS Campaign.
Configure the following options.
Campaign Name
Enter an internal name that helps you identify the campaign.
For example:
Restaurant Weekend Offer
The Campaign Name is used for administration and does not need to be part of the message received by customers.
From Number
Enter the sender number used by your SMS gateway.
The required format depends on the SMS provider and the sender configuration approved for your account.
SMS Text
Enter the message that should be sent to customers.
Keep the message short and make the purpose of the communication clear.
For example:
Thank you for visiting White Palace. Join us this weekend and enjoy our special restaurant offer.
Remember that SMS providers may split longer messages into multiple SMS segments.
Insert Tags
Click Insert Tag to personalize the SMS using available customer information.
Tags can be used to insert supported values from the customer profile into the message.
Use personalization only when the required profile information is available for the selected recipients.
Send a Test
Before sending the campaign, use Send a test.
Enter a mobile phone number.
Click Send.
Confirm that the message is received.
Check the sender information, message text, personalization, and any links included in the SMS.
Always test a new campaign before sending it to customers.
Select Location
Enable Select location when the SMS campaign should be sent only to customers associated with a specific WiFi location.
This is useful when different hotels, restaurants, venues, or other locations should receive different messages.
Leave location filtering disabled when the campaign should use the broader eligible recipient selection.
Send Later
Enable Send later when the campaign should be delivered at a scheduled date and time.
Use this option for promotions, reminders, events, or other communications that need to be delivered at a specific time.
If Send Later is not enabled, the campaign can be sent immediately.
Save or Send Campaign
Use Save when you want to store the campaign without sending it.
Use Send Campaign when the message is complete, tested, and ready for delivery.
Before sending, verify:
Campaign Name
From Number
SMS Text
Personalization tags
Recipient location
Schedule
SMS gateway operation
Contact Permission
SMS marketing communications should be sent only to customers who are eligible to receive them according to your configured consent process and applicable requirements.
Enable Contact Permission on the Splash Page when visitors should be able to provide or decline permission for marketing communications.
The customer's phone number and marketing permission should be treated separately: providing a phone number for WiFi access or verification does not by itself mean that the customer agreed to receive marketing messages.
Customers can review or change available communication preferences through their User Profile.
Test Before Sending
Before sending a production SMS campaign:
Confirm that the SMS gateway is working.
Review the recipient selection.
Check the message for spelling and formatting.
Verify Insert Tags.
Send a test SMS.
Test any links included in the message.
Confirm the location filter.
Check the Send Later schedule when used.
Send the campaign only after the complete test succeeds.