
Email Campaign
Email Campaigns allow you to send targeted informational and marketing emails to WiFi customers who are eligible to receive your communications.
Use the Email Campaign section to create branded emails, select recipients, schedule delivery, test the message, and review campaign results.
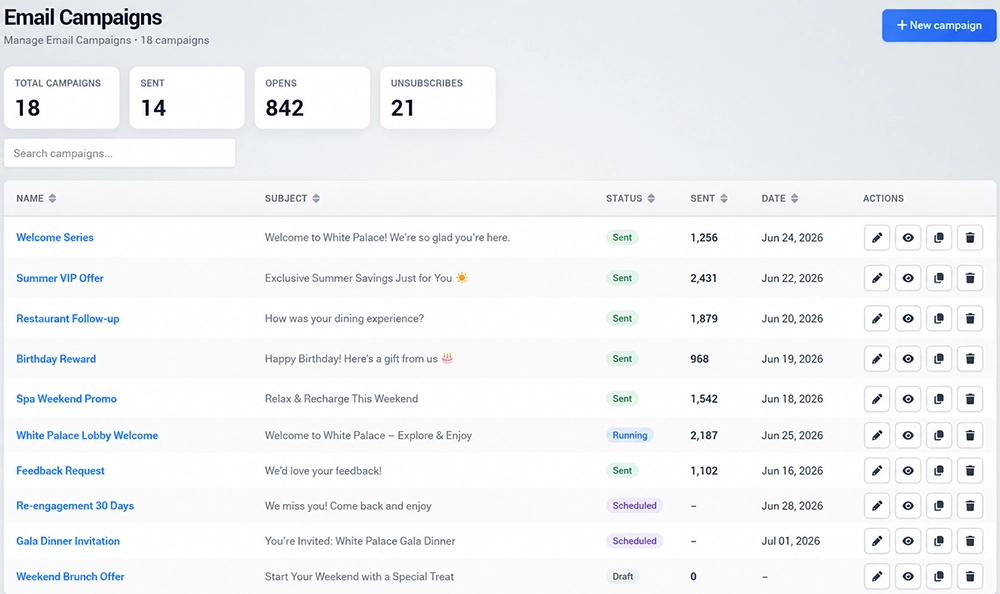
Email Campaigns
The Email Campaign panel displays previously created campaigns and their current activity.
Depending on the campaign, you can review information such as:
Status
Subject
Sender
Emails sent
Opens
Date
Use Search to find an existing campaign and the available actions to edit or manage it.
Create a New Email Campaign
To create a campaign:
Open WiFi Marketing → Email Campaigns.
Click New Email Campaign.
Enter the Campaign name.
Select an email template.
Click Continue.
You can start with a blank email or use one of the predefined templates.
Available templates can include designs for:
Welcome emails
Newsletters
Hotels
Restaurants
Cafés
Birthday messages
Receipts
Other promotional or informational campaigns
Choose the template closest to your intended message and customize it in the editor.
Email Campaign Editor
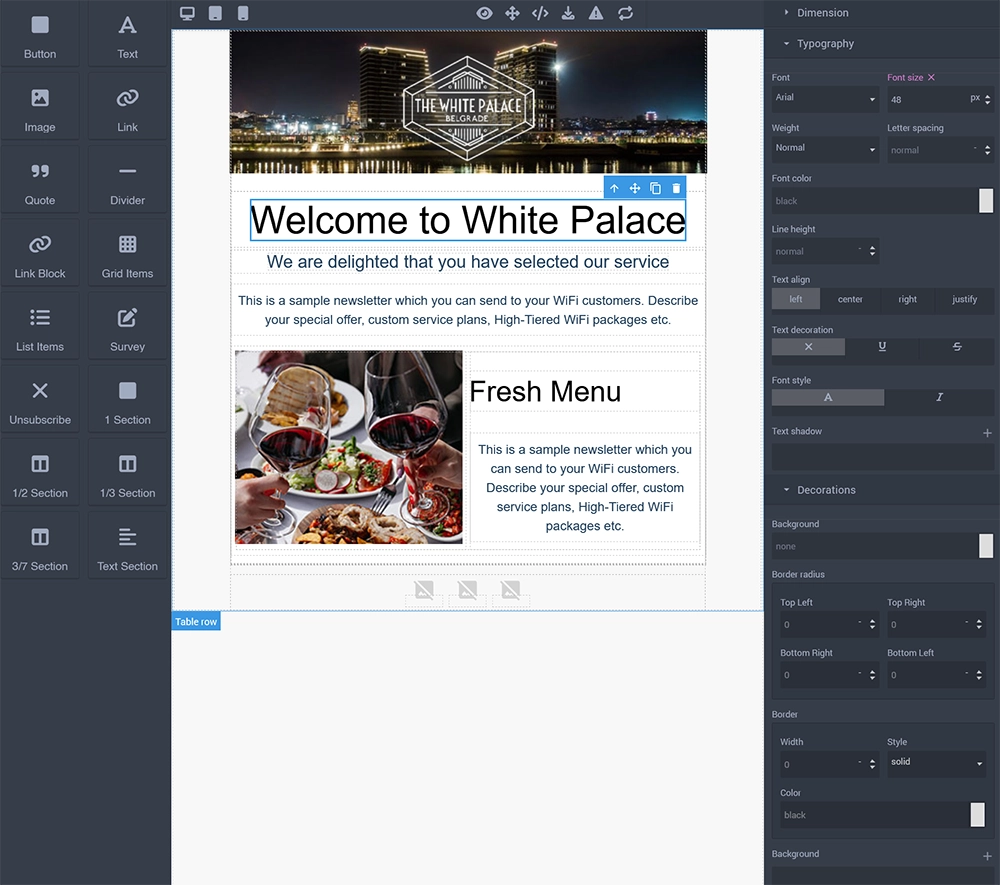
The visual Email Campaign Editor allows you to modify the selected template without coding.
Click an element in the email to edit its content and appearance. The right-side panel provides styling controls for the selected component.
Depending on the element, available settings can include:
Dimensions
Font and font size
Font weight
Text alignment
Font color
Line height
Background
Border
Border radius
Spacing and other visual properties
Changes are shown directly in the email preview.
Add Email Elements
The editor provides reusable elements that can be added to the email layout.
Available components include:
Button – Add a call-to-action button.
Text – Add headings, paragraphs, or other text.
Image – Add images or promotional graphics.
Link – Add a clickable link.
Quote – Highlight a quotation or customer message.
Divider – Visually separate sections.
Link Block – Create a larger linked content area.
Grid Items – Organize content into a grid.
List Items – Add structured lists.
Survey – Link recipients to a configured survey.
Unsubscribe – Add an unsubscribe option.
Layout elements such as 1 Section, 1/2 Section, 1/3 Section, 3/7 Section, and Text Section can be used to organize the email content.
Edit and Arrange Content
Select an existing element to change its text, image, link, typography, size, or other available properties.
Elements can also be repositioned within the email layout.
Use sections and columns to keep the message easy to scan, especially on mobile devices.
A typical campaign can include:
Company or property branding.
A clear headline.
Short introductory text.
An offer, announcement, or useful information.
Supporting image.
Call-to-action button.
Unsubscribe option when required.
Avoid adding unnecessary content that makes the email difficult to read.
Survey
Add the Survey element when you want email recipients to open and complete one of your configured surveys.
Survey responses can then be reviewed through the corresponding Survey reports and statistics.
Create the survey before adding it to the email campaign.
Unsubscribe
Use the Unsubscribe element for marketing emails so recipients can withdraw from future communications.
The unsubscribe process should be clearly available and should reflect your organization's communication and privacy requirements.
Do not remove the unsubscribe option from campaigns where recipients are entitled to opt out.
Configure the Campaign
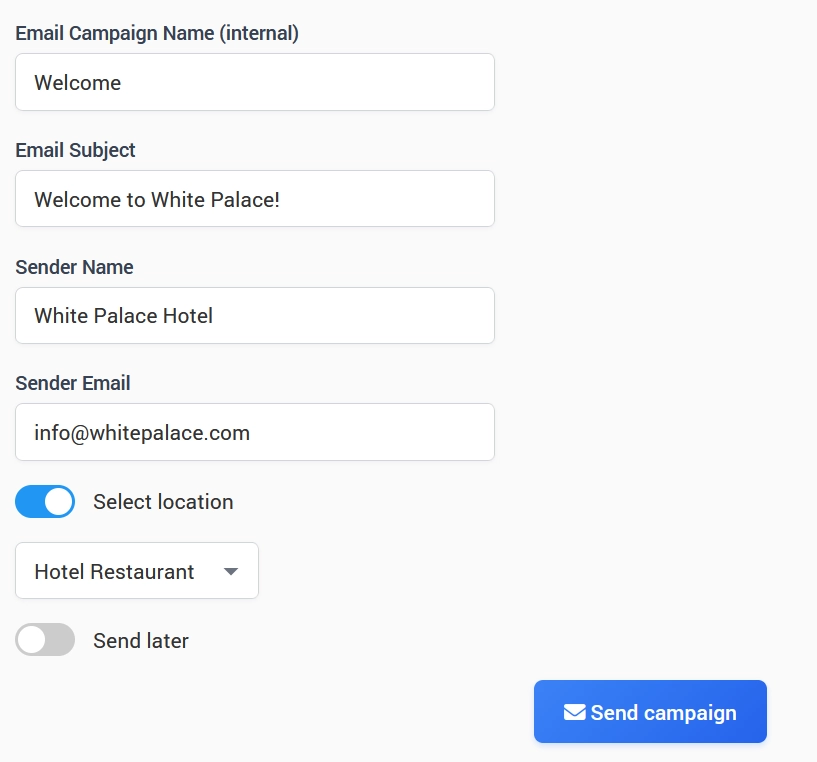
Click Campaign to configure delivery settings for the email.
Depending on the campaign configuration, available settings can include:
Email subject
Sender name
Sender email
Location
Recipient selection
Delivery date or schedule
Subject
Use a clear subject that describes the purpose of the email.
Avoid misleading or excessively promotional subject lines.
Sender Name and Email
Use sender information that recipients can recognize.
Email delivery settings should first be configured under My Account → E-mail.
Location
When the campaign should target customers associated with a particular WiFi location, select the required location.
This allows campaigns to be relevant to the venue or property where the customer used WiFi.
Send Later
Use the scheduling option when the campaign should be delivered at a specific date or time instead of immediately.
Review the campaign before scheduling it.
Test the Email
Click Test before sending the campaign to customers.
Send the test message to an address you can access and verify:
Subject
Sender information
Images
Text formatting
Links
Buttons
Survey links
Unsubscribe link
Desktop appearance
Mobile appearance
Always open the test email in a real email client rather than relying only on the editor preview.
Preview on Different Devices
Use the available desktop, tablet, and mobile views to check how the campaign adapts to different screen sizes.
Most recipients will read emails on mobile devices, so verify that:
Headlines fit correctly.
Images resize properly.
Text remains readable.
Buttons are easy to tap.
Columns do not make content too narrow.
Save the Campaign
Click Save while editing to store your changes.
Before sending or scheduling the campaign, verify both the email content and the Campaign settings.
Campaign Results
After a campaign is sent, use the campaign reporting information to review its performance.
Available statistics can include:
Campaign status
Date
Location
Sender
Subject
Emails sent
Opens
Unique users
Unsubscribes
Use these results to compare campaigns and understand which messages generate better engagement.
Contact Permission
Marketing emails should be sent only to users who are eligible to receive the communication according to your configured consent process and applicable requirements.
WiFi Hotspot can collect Contact Permission through the Splash Page so visitors can indicate whether they want to receive marketing communications.
Users can later review or change the available communication preference through their User Profile.
Contact Permission should remain separate from the Terms of Use required for WiFi access.
Test Before Sending
Before sending a production campaign:
Review the recipient selection.
Verify the subject and sender details.
Check all text and images.
Test every link and button.
Verify Survey links when used.
Confirm the unsubscribe option.
Send a test email.
Check the email on desktop and mobile.
Review the delivery or schedule settings.
Save and send the campaign only after the complete test is successful.