
Voucher Login & Data Collection
Voucher Login & Data Collection allows guests to connect using a valid login code while optionally providing customer information during the first login.
You can choose which profile fields should be collected, make selected fields mandatory, and optionally verify the visitor's email address or phone number.
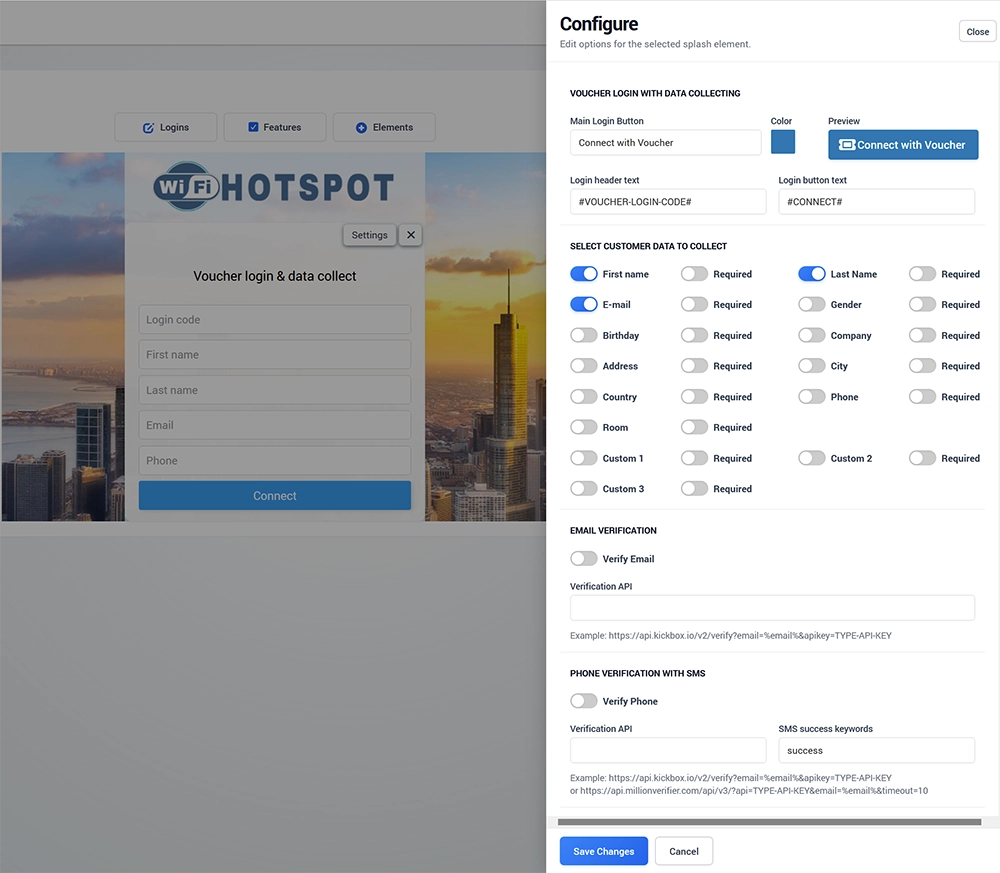
Add Voucher Login & Data Collection
To add this login method:
Open Splash Pages.
Select the Splash Page you want to edit.
Open the Login tab.
Click Logins.
Locate Voucher Login & Data Collection.
Click Add.
Open Settings.
Configure the required options.
Click Save Changes.
Save the Splash Page.
The guest will then be able to enter a valid voucher or login code together with any customer information you choose to collect.
Main Login Button
Use Main Login Button to define the text displayed on the Splash Page.
For example:
Connect with Voucher
You can also choose the button color and review the result in the Preview area.
Login Header Text
Use Login header text to customize the heading displayed above the voucher form.
The default language token can be:
#VOUCHER-LOGIN-CODE#
Using the predefined WiFi Hotspot token allows the corresponding translated text to be displayed when the visitor's language is supported.
Login Button Text
Use Login button text to configure the final button used to submit the voucher and customer information.
The default token can be:
#CONNECT#
You can replace the predefined value when custom wording is required.
Select Customer Data to Collect
Choose which information should be collected when the visitor uses the voucher.
Available fields include:
First name
Last Name
E-mail
Gender
Birthday
Company
Address
City
Country
Phone
Room
Custom 1
Custom 2
Custom 3
Enable only the information required for your WiFi service.
For example, a simple visitor registration may collect only name and email, while a hotel deployment may also collect the guest's room information.
Required Fields
Each enabled customer-data field can also be marked as Required.
When Required is enabled, the visitor must complete that field before the voucher login process can continue.
This provides separate control over:
Whether a field is displayed.
Whether the visitor must complete it.
For example, you can display Phone as an optional field while requiring E-mail and First name.
Avoid making unnecessary fields mandatory, as longer forms can make guest WiFi access more difficult.
Custom Data Fields
Use Custom 1, Custom 2, and Custom 3 when standard profile fields do not cover information required for your deployment.
Custom fields can also be marked as Required.
Make sure the purpose of each custom field is clear to visitors.
Email Verification
Voucher Login can optionally validate the email address entered by the visitor.
Verify Email
Enable Verify Email when the supplied email address should be checked through an external email verification service.
Enter the required endpoint under Verification API.
WiFi Hotspot can pass the visitor's email address to the configured verification service before completing the login process.
The exact API URL, credentials, and response requirements depend on the email verification provider you use.
The interface supports services using URL-based verification requests, such as the example shown for Kickbox.
Always use the current API documentation supplied by your selected verification provider.
Phone Verification with SMS
Voucher Login can also verify the visitor's mobile phone number.
Enable Verify Phone when SMS verification should be required.
Verification API
Enter the SMS gateway or verification service endpoint used to send or verify the required phone message.
The exact URL format depends on the communication provider.
SMS Success Keywords
Use SMS success keywords to specify the response that indicates successful processing by the SMS service.
For example:
success
The value must correspond to the response returned by your SMS provider.
Before enabling phone verification for guests, test the complete process using a real mobile number.
Voucher Login Workflow
A typical Voucher Login & Data Collection process is:
The guest connects to WiFi.
The Splash Page opens.
The guest selects Connect with Voucher.
The guest enters the voucher or login code.
Enabled customer data fields are displayed.
Required fields must be completed.
Email verification is performed when enabled.
Phone verification is performed when enabled.
WiFi Hotspot validates the voucher.
Internet access is granted according to the Internet Plan associated with the voucher.
Customer Data and Privacy
Collect only information required for the intended WiFi service.
If email addresses or phone numbers will also be used for marketing communication, use the appropriate Contact Permission functionality and follow your privacy policy and applicable data protection requirements.
Providing information for WiFi access should not automatically be treated as marketing consent.
Test Voucher Login
After configuring the login method:
Click Save Changes.
Save the Splash Page.
Create or use a valid test voucher.
Connect a test device to the guest WiFi network.
Select Connect with Voucher.
Enter the test voucher or login code.
Verify that the correct customer-data fields are displayed.
Confirm that Required fields cannot be skipped.
Test email verification when enabled.
Test phone verification when enabled.
Complete authentication.
Confirm that Internet access is granted.
Verify that the collected customer information and session appear correctly in WiFi Hotspot.
Test both valid and invalid voucher codes before making the login method available to guests.