
User Login
User Login allows existing WiFi users to connect with their account credentials or a login code.
The login form can also be configured to allow new users to sign up with a code and to collect selected profile information during signup.
Add User Login to a Splash Page
To add User Login:
Open Splash Pages.
Select the Splash Page you want to edit.
Open the Login tab.
Click Logins.
Locate User Login.
Click Add.
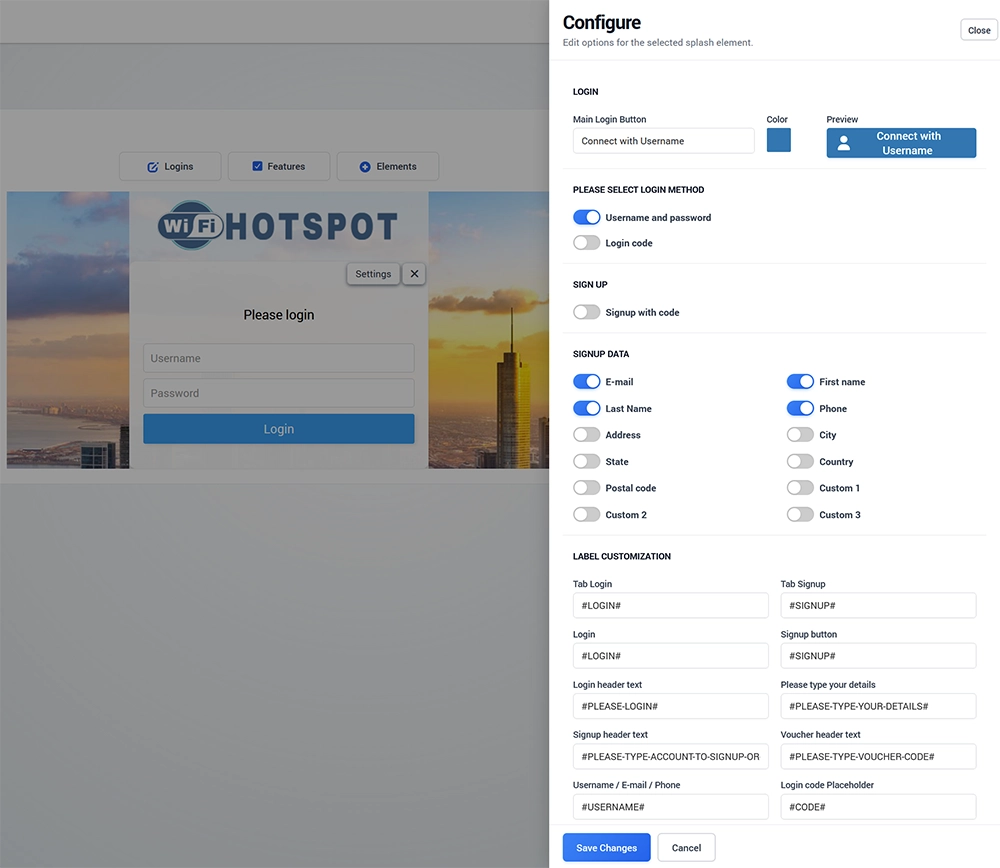
Open Settings to configure the login method.
Click Save Changes when finished.
Save the Splash Page.
By default, User Login can be configured for standard username and password authentication.
Main Login Button
Use Main Login Button to define the text displayed on the button that opens the User Login form.
For example:
Connect with Username
You can also select the button color and review the result in the Preview area.
Use clear button text so visitors immediately understand which login option they are selecting.
Select Login Method
User Login supports different credential-based login options.
Username and Password
Enable Username and password when users should authenticate with their existing WiFi Hotspot account credentials.
The user enters the username and password associated with the account and continues with the login process.
Login Code
Enable Login code when users should be able to authenticate using a code instead of entering a username and password.
This can be useful when access credentials are distributed as codes or vouchers.
You can enable the login methods required for your guest WiFi workflow.
Signup with Code
Enable Signup with code when visitors should be able to create or activate an account using a valid code.
When this option is enabled, the User Login form can provide separate Login and Signup options.
A typical signup process is:
The visitor opens the User Login form.
Selects the Signup tab.
Enters the required account information.
Enters the supplied code.
Submits the form.
WiFi Hotspot creates or updates the user account according to the configured access rules.
The visitor receives Internet access.
This can be used when WiFi access codes are provided at reception desks, sales points, events, or other locations.
Signup Data
The Signup Data section controls which user details can be requested during signup.
Available fields include:
E-mail
First name
Last Name
Phone
Address
City
State
Country
Postal code
Custom 1
Custom 2
Custom 3
Enable only the fields required for your WiFi service.
For example, a simple guest WiFi signup may request only an email address, while a business-specific registration process may require additional contact or profile information.
Avoid collecting information that you do not need.
Custom Fields
Custom 1, Custom 2, and Custom 3 can be used when the standard signup fields do not cover the information required for your deployment.
Use custom fields only when additional business-specific information is necessary.
When custom fields are enabled, use Label Customization to make their purpose clear to visitors.
Label Customization
The Label Customization section allows you to change text displayed in the User Login form.
Available labels include items such as:
Login tab
Signup tab
Login button
Signup button
Login header text
Signup header text
User details instructions
Voucher or code instructions
Username / E-mail / Phone
Login code placeholder
WiFi Hotspot can use predefined language labels such as:
#LOGIN##SIGNUP##USERNAME##CODE#
These values allow the appropriate translated text to be displayed when supported by the selected Splash Page language.
Replace a predefined label only when you need custom wording for this particular Splash Page.
Login and Signup Workflow
The User Login method can support both returning and new WiFi users.
Returning User
A returning user can:
Open User Login.
Remain on the Login tab.
Enter the configured account credentials or login code.
Complete authentication.
Receive Internet access according to the assigned Internet Plan.
New User
When signup is enabled, a new visitor can:
Open the Signup tab.
Enter the required signup data.
Enter the required code when configured.
Create the account.
Receive Internet access according to the assigned plan and code.
The exact fields displayed depend on the User Login configuration.
Existing Accounts and New Codes
When your access model allows an existing user to receive additional access through a new code, the user can use the configured signup/code process to update the existing account according to the code and Internet Plan rules.
This can be useful when users return and purchase or receive additional WiFi access without creating an entirely new identity.
Customize the Guest Experience
Keep the login form as simple as possible.
For most deployments:
Use clear button text.
Request only necessary signup information.
Keep labels short.
Use a login method visitors can easily understand.
Test both Login and Signup when both options are enabled.
If several different login methods are available on the same Splash Page, make their purpose clear so users can quickly select the correct option.
Test User Login
After configuring User Login:
Click Save Changes.
Save the Splash Page.
Connect a test device to the guest WiFi network.
Open the Splash Page.
Select User Login.
Test Username and Password login when enabled.
Test Login Code when enabled.
Test Signup with Code when enabled.
Verify all enabled signup fields.
Confirm that customized labels are displayed correctly.
Complete authentication.
Verify that Internet access is granted.
Confirm that the user session appears in the WiFi Hotspot dashboard.
If both new and existing users will use this method, test both workflows before making the Splash Page available to guests.