
Marketing Campaigns
Marketing Campaigns allow you to display targeted video, image, or app advertising as part of the guest WiFi access process.
Before adding this login method to a Splash Page, create at least one active campaign in the Marketing section.
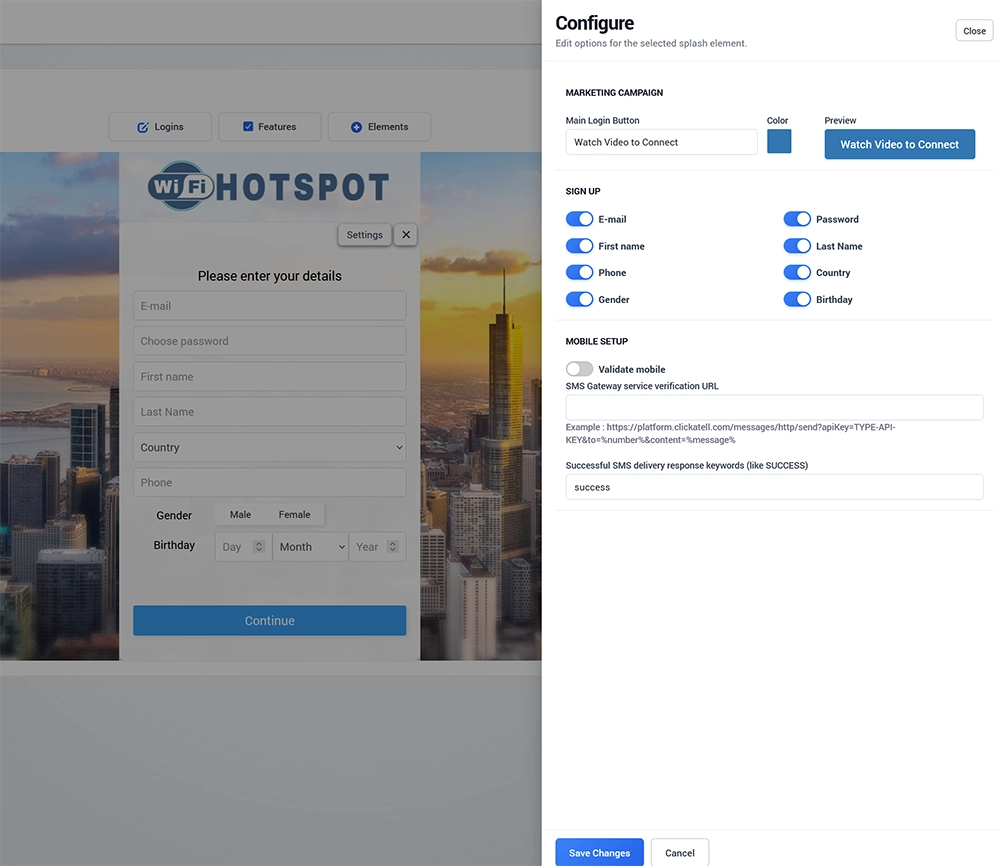
Add Marketing Campaigns to a Splash Page
To add Marketing Campaigns:
Open Splash Pages.
Select the Splash Page you want to edit.
Open the Login tab.
Click Logins.
Locate Marketing Campaigns.
Click Add.
Open Settings.
Configure the required signup and mobile options.
Click Save Changes.
Save the Splash Page.
The Marketing Campaign login method can then display the active campaign assigned to the relevant location and audience.
Main Login Button
Use Main Login Button to define the text displayed on the Splash Page.
For example:
Watch Video to Connect
You can also select the button color and review the result in the Preview area.
Use clear wording so visitors understand that campaign content will be displayed before WiFi access is granted.
Signup Data
The Signup section controls which visitor details are requested before the campaign is displayed.
Available fields include:
E-mail
Password
First name
Last Name
Phone
Country
Gender
Birthday
Enable only the fields required for your campaign or WiFi service.
These fields can also be useful when campaigns are targeted by audience attributes such as age, gender, location, or other profile information configured in the campaign.
Avoid collecting information that is not needed.
Mobile Setup
Enable Validate mobile when the visitor's mobile number should be verified through an SMS gateway before continuing.
This option uses an SMS verification service URL.
Configure:
SMS Gateway service verification URL
Successful SMS delivery response keywords
The verification URL can contain the required provider parameters for the recipient number and message content.
The exact format depends on the SMS provider you use.
SMS Gateway Service Verification URL
Enter the verification URL provided by your SMS service.
The current interface supports URL-based integration where variables such as the user's number and message can be passed to the provider.
For example, the URL can include placeholders for:
Phone number
Verification message
API key or account credentials
Always follow the current API format required by your SMS provider.
Successful SMS Delivery Response
Use Successful SMS delivery response keywords to define the provider response that indicates a successful SMS submission.
For example:
success
WiFi Hotspot can use this value to determine whether the verification message was accepted by the external SMS service.
The exact response depends on the SMS provider.
How Marketing Campaign Login Works
A typical campaign workflow is:
The guest connects to WiFi.
The Splash Page opens.
The visitor selects Marketing Campaigns.
Required signup information is entered.
Mobile verification is completed when enabled.
WiFi Hotspot selects an eligible active campaign.
The selected campaign ad is displayed.
The guest completes the required viewing or interaction.
Internet access is granted according to the configured campaign and WiFi access rules.
The exact campaign shown depends on the Marketing Campaign configuration, such as location, schedule, audience criteria, campaign limits, and active ads.
Create Campaigns Before Enabling the Login Method
At least one campaign should be configured before using the Marketing Campaign login method.
Campaign configuration is handled separately from the Splash Page.
A typical setup includes:
Create Ads
Create a Campaign
Assign the campaign Location
Set the Start and End dates
Configure Advertiser when required
Define Gender or Age targeting when used
Configure Limit type and Ads Interval
Add one or more video, image, or app ads
Activate the campaign
The Splash Page login method determines how users enter the campaign flow, while the Marketing section determines which campaign and ads are shown.
Campaign Targeting
Marketing Campaigns can use the available campaign options to control where, when, and to whom advertising is displayed.
Depending on the configuration, options can include:
Location
Start and End date
Advertiser
Gender
Age range
Limit type
Ads Interval
Audience targeting works only when the required visitor profile information is available.
Campaign Reports
Marketing Campaign activity can be reviewed through campaign analytics and reports.
Available reporting can include:
Campaign impressions
Clicks
Users
Conversion
Campaign duration
Watched time
Engagement
Location
Hotspot
Device information
Campaign user data and reporting can also be exported where available.
Test Marketing Campaign Login
After configuring the login method:
Click Save Changes.
Save the Splash Page.
Confirm that at least one active campaign exists.
Connect a test device to the guest WiFi network.
Select Marketing Campaigns.
Enter all required signup information.
Test mobile verification when enabled.
Confirm that the correct campaign is displayed.
Complete the video or image ad process.
Verify that Internet access is granted.
Confirm that the campaign impression and user activity appear in the corresponding reports.
Test with the same type of audience criteria used by the campaign so you can confirm that targeting works correctly.