
Login or Sign Up
Login or Sign Up allows existing WiFi users to log in while new visitors can create an account and select an available Internet Plan.
The same login method can support free and paid WiFi access, multiple authentication options, customer data collection, payment gateways, signup codes, and email or phone verification.
Add Login or Sign Up to a Splash Page
To add Login or Sign Up:
Open Splash Pages.
Select the Splash Page you want to edit.
Open the Login tab.
Click Logins.
Locate Login or Signup.
Click Add.
Open Settings.
Configure the required options.
Click Save Changes.
Save the Splash Page.
The guest will be able to switch between Login and Signup according to the configured options.
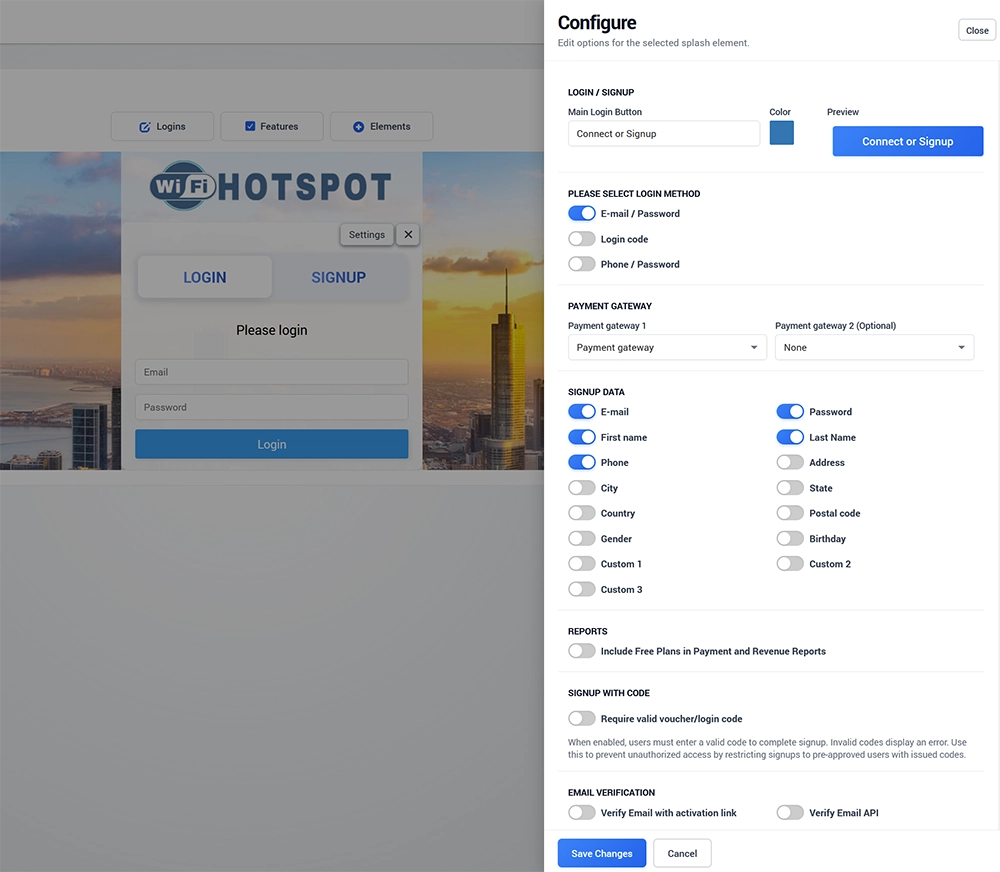
Main Login Button
Use Main Login Button to define the text displayed on the Splash Page.
For example:
Connect or Signup
You can also select the button color and review its appearance in the Preview area.
Select Login Method
Choose how existing users can authenticate.
Available options include:
E-mail / Password
Allow existing users to log in with the email address and password associated with their WiFi account.
Login Code
Allow users to authenticate with a login code instead of an email and password.
Phone / Password
Allow users to log in using their phone number and password.
Enable only the login methods you want to offer to visitors.
Payment Gateway
Select the payment gateway used when visitors purchase paid Internet Plans during signup.
You can configure:
Payment gateway 1
Payment gateway 2 (Optional)
A second payment gateway can be offered when you want to give users another available payment option.
Payment gateways must first be configured under Setup → Payments.
Free and Paid Signup
Login or Sign Up can offer both free and paid Internet Plans.
For free access, create an Internet Plan with a price of 0.00. When the visitor selects a free plan, no payment is required.
Paid Internet Plans use the configured payment gateway to complete the purchase before the corresponding WiFi access is activated.
This allows the same signup page to offer, for example:
Free guest WiFi
Daily paid access
Premium WiFi
Longer-term access plans
Signup Data
The Signup Data section determines which information is requested when a new user creates an account.
Available fields include:
E-mail
Password
First name
Last Name
Phone
Address
City
State
Country
Postal code
Gender
Birthday
Custom 1
Custom 2
Custom 3
Enable only the information required for your WiFi service.
For a simple signup process, email, password, and basic contact information may be sufficient. Additional profile fields can be enabled when they are genuinely required.
Custom Signup Fields
Custom 1, Custom 2, and Custom 3 can be used when information specific to your business needs to be collected.
Use Label Customization or other available field configuration so visitors clearly understand what information is being requested.
Include Free Plans in Reports
Enable Include Free Plans in Payment and Revenue Reports when free-plan signup activity should also appear in the corresponding reporting views.
This can be useful when you want the same reports to provide visibility into both free and paid plan activity.
Free plans remain zero-value plans and do not generate paid revenue.
Require a Valid Voucher or Login Code
Enable Require valid voucher/login code when new users should be allowed to complete signup only after entering a valid issued code.
When enabled:
The visitor starts the signup process.
A valid voucher or login code is required.
WiFi Hotspot validates the code.
Invalid codes are rejected.
Signup continues only when the code is accepted.
This is useful when account creation should be restricted to pre-approved visitors, customers, event attendees, hotel guests, or other users who have already received a code.
This option is different from Login Code under Login Methods: Login Code is used for authentication, while Require valid voucher/login code controls whether a new signup is permitted.
Email Verification
New users can optionally be required to verify their email address.
Two methods are available:
Verify Email with activation link
Verify Email API
Verify Email with Activation Link
Enable this option when the user must confirm ownership of the entered email address.
The typical process is:
The visitor completes signup.
An activation link is sent to the entered email address.
The visitor receives temporary Internet access.
The visitor opens the activation email.
The activation link confirms the email address.
Full Internet access is enabled according to the selected Internet Plan.
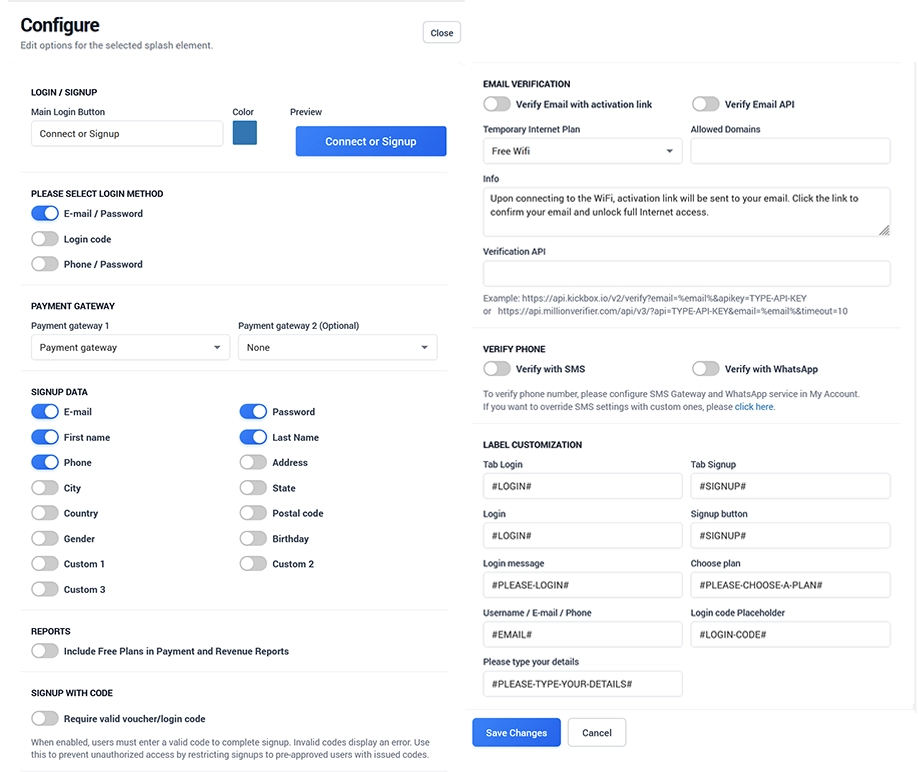
Temporary Internet Plan
Select a Temporary Internet Plan that provides limited Internet access while the user completes email verification.
The temporary plan should provide enough time to access the mailbox and open the activation link without providing unrestricted normal Internet access.
Create and manage temporary plans under Setup → Internet Plans.
Allowed Domains
Use Allowed Domains when specific destinations need to remain reachable while the Temporary Internet Plan is active.
Only allow domains required for the verification process.
Email Verification Message
Use Info to explain what the visitor needs to do.
For example:
Upon connecting to the WiFi, an activation link will be sent to your email. Click the link to confirm your email and unlock full Internet access.
Keep this instruction short and clear.
Verify Email API
Enable Verify Email API when an external email validation service should be used.
Enter the service endpoint under Verification API.
The interface supports URL-based services where the entered email address can be passed to the provider for validation.
The exact endpoint, API key, validation response, and service requirements depend on the external provider.
Always follow the current API documentation of the verification service you use.
Verify Phone
New users can also be required to verify their mobile number.
Available methods are:
Verify with SMS
Verify with WhatsApp
Verify with SMS
Enable Verify with SMS to send the verification code through the configured SMS service.
Configure the SMS gateway first under:
My Account → SMS
Verify with WhatsApp
Enable Verify with WhatsApp to send verification through the configured WhatsApp service.
Configure WhatsApp first under:
My Account → WhatsApp
Test the selected verification method from a real guest device before using it in production.
Label Customization
The Label Customization section controls the text displayed in the Login and Signup interface.
Available labels include:
Tab Login
Tab Signup
Login
Signup button
Login message
Choose plan
Username / E-mail / Phone
Login code placeholder
Please type your details
Default values can use WiFi Hotspot language tokens such as:
#LOGIN##SIGNUP##PLEASE-LOGIN##PLEASE-CHOOSE-A-PLAN##EMAIL##LOGIN-CODE#
Using the predefined labels allows supported text to be translated according to the visitor's browser language.
Use custom wording only when you want to override the default translated text.
Typical Login Workflow
For an existing user:
Open Connect or Signup.
Select Login.
Enter the configured credentials.
Click Login.
Receive Internet access according to the existing account and Internet Plan.
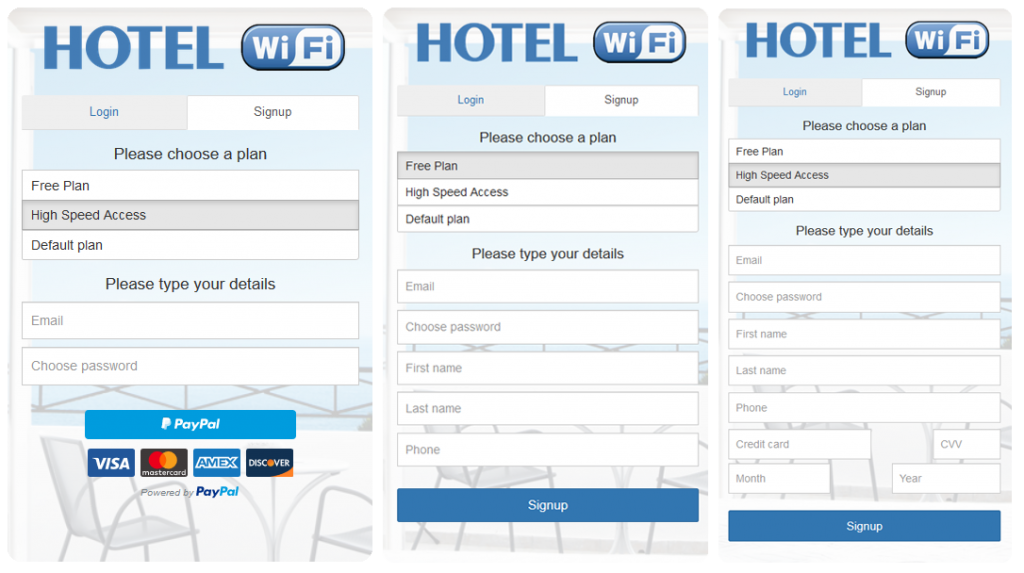
Typical Signup Workflow
For a new visitor:
Open Connect or Signup.
Select Signup.
Enter the required signup information.
Enter a voucher or login code when required.
Select an available Internet Plan.
Complete payment when a paid plan is selected.
Complete email or phone verification when enabled.
Receive Internet access according to the selected plan.
Test Login or Sign Up
After configuring the login method:
Click Save Changes and save the Splash Page.
Test each enabled login method.
Create a new user through Signup.
Test a free Internet Plan.
Test a paid plan when payments are enabled.
Verify both payment gateways when two are offered.
Test the valid-code requirement when enabled.
Test email activation and Email Verification API.
Test SMS or WhatsApp verification.
Verify all enabled signup fields and customized labels.
Confirm successful Internet access.
Check that the account, payment, and session information appears correctly in the WiFi Hotspot dashboard.