
Hotel PMS Integration
Hotel PMS Integration connects WiFi Hotspot with a supported hotel Property Management System (PMS), allowing hotel guests to access WiFi using their reservation information.
Instead of distributing separate WiFi usernames or vouchers at reception, guests can authenticate with information such as their room number and name. WiFi Hotspot verifies the guest information through the configured PMS interface before granting access.
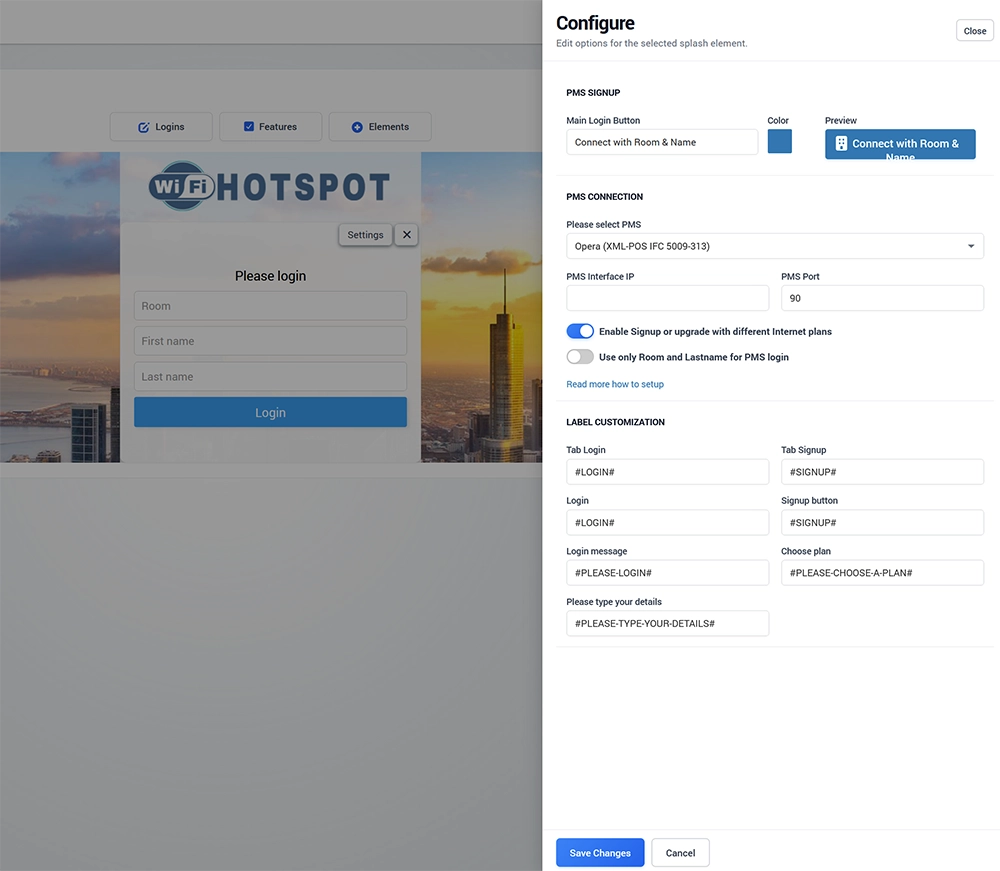
Add Hotel PMS Integration
To add Hotel PMS Integration to a Splash Page:
Open Splash Pages.
Select the Splash Page you want to edit.
Open the Login tab.
Click Logins.
Locate Hotel PMS Integration.
Click Add.
Open Settings.
Configure the PMS connection and login options.
Click Save Changes.
Save the Splash Page.
Main Login Button
Use Main Login Button to define the text displayed on the Splash Page.
For example:
Connect with Room & Name
You can also select the button color and review the result in the Preview area.
Use wording that hotel guests can immediately understand.
How PMS Login Works
A typical guest login process is:
The guest connects to the hotel WiFi.
The Splash Page opens.
The guest selects Connect with Room & Name.
The guest enters the requested reservation information.
WiFi Hotspot checks the information through the configured PMS Interface.
If a matching checked-in guest is found, the appropriate WiFi access is provided.
The guest receives Internet access according to the assigned Internet Plan.
The integration can support free or paid Internet Plans, depending on the hotel and PMS configuration.
PMS Connection
The PMS Connection section defines which hotel PMS and PMS Interface WiFi Hotspot should use.
Select PMS
Use Please select PMS to choose the Property Management System used by the hotel.
For example, the current interface includes integrations such as:
Opera (XML-POS IFC 5009-313)
The exact available PMS systems depend on the supported Antamedia PMS interfaces.
WiFi Hotspot supports integrations with systems including Oracle Opera, Fidelio Suite8, IDS Fortune Next, Medallion, Protel, InnQuest, ICG, Clarity, Comtrol Lodging Link, InnGenius, and other hotel systems.
PMS Interface IP
Enter the IP address of the computer or server running the Antamedia PMS Interface.
The PMS Interface provides communication between WiFi Hotspot and the hotel's PMS system.
For most deployments, the PMS Interface is installed on a computer in the same hotel network as the PMS software. Antamedia currently recommends contacting support for installation and initial PMS Interface configuration.
PMS Port
Enter the port used by the PMS Interface.
Enter the port configured for the PMS Interface in your deployment. In the example shown, port 90 is used.
If network access or port forwarding is required between the PMS Interface and WiFi Hotspot, configure it according to the deployment instructions provided during PMS integration setup.
Enable Signup or Upgrade with Different Internet Plans
Enable Signup or upgrade with different Internet plans when hotel guests should be able to select from multiple WiFi access options.
This can be used to provide choices such as:
Complimentary guest WiFi
Higher-speed access
Premium Internet access
Longer access periods
Conference or business packages
The available access conditions are defined by the configured Internet Plans.
When the selected PMS integration supports room charging, charges for paid Internet Plans can be posted to the guest room according to the hotel and PMS configuration.
Use Only Room and Last Name for PMS Login
Enable Use only Room and Lastname for PMS login when guests should authenticate using:
Room number
Last name
instead of entering additional name information.
This can simplify the login form and make the WiFi access process faster for hotel guests.
Choose the login format that matches the reservation information reliably available from your PMS.
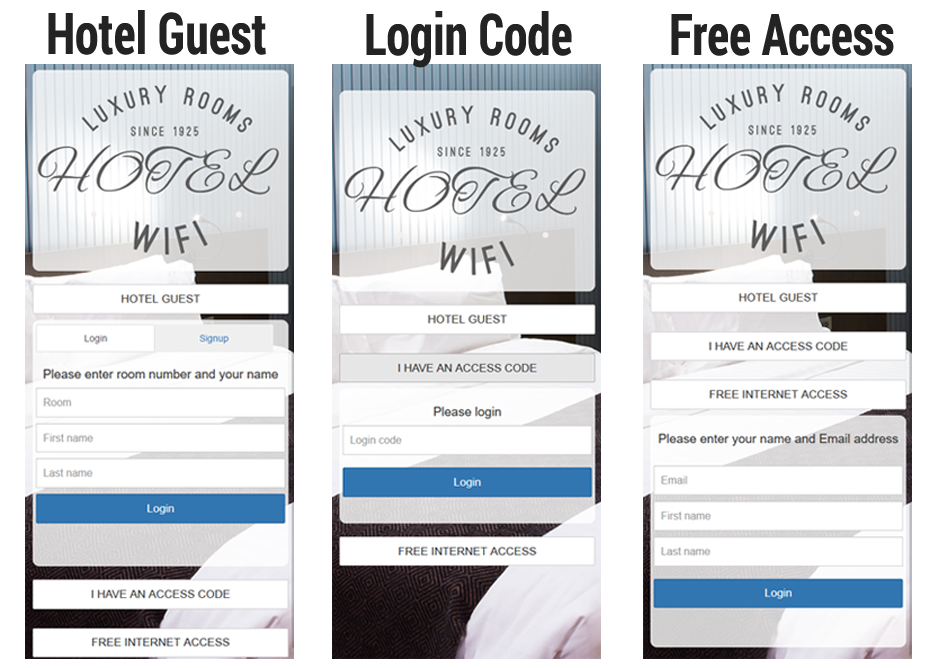
Guest Signup and Login
Depending on the configuration, the PMS login page can provide separate Login and Signup options.
A first-time guest can use Signup to validate the reservation and obtain the appropriate WiFi access.
Returning guests can then use the configured PMS login method according to the account and Internet Plan settings.
Autologin for Returning Guests
Internet Plans can also use Autologin to simplify future connections for returning devices.
With supported MikroTik deployments, WiFi Hotspot handles device recognition even when modern devices use MAC randomization, allowing Autologin to remain reliable without requiring guests to manually disable private MAC addressing.
For other supported network platforms, Autologin depends on stable device identification and the MAC Randomization Assistant can be used when a guest needs to update an outdated device entry.
Label Customization
The Label Customization section allows you to change the text displayed in the PMS login and signup interface.
Available labels include:
Tab Login
Tab Signup
Login
Signup button
Login message
Choose plan
Please type your details
Default values can use WiFi Hotspot language tokens such as:
#LOGIN##SIGNUP##PLEASE-LOGIN##PLEASE-CHOOSE-A-PLAN##PLEASE-TYPE-YOUR-DETAILS#
Using the predefined tokens allows supported text to be translated according to the visitor's browser language.
Replace a token only when you need custom wording for the hotel or Splash Page.
PMS Interface Installation
Hotel PMS Integration requires the Antamedia PMS Interface.
For a new deployment:
Contact Antamedia to confirm that the hotel PMS is supported.
Install the PMS Interface on the appropriate computer or server.
Configure communication with the hotel PMS.
Confirm the PMS Interface IP and port.
Select the corresponding PMS in the Splash Page configuration.
Configure the required Internet Plans.
Test guest validation with a real or test PMS reservation.
Verify both WiFi access and room charging when paid plans are used.
The PMS Interface should be configured before the PMS login method is made available to hotel guests.
Test Hotel PMS Login
Before enabling PMS login in production:
Create or identify a valid test reservation in the PMS.
Save the PMS Login configuration.
Connect a test device to the hotel guest WiFi.
Open the Splash Page.
Select Connect with Room & Name.
Enter valid reservation information.
Confirm successful guest verification.
Verify that the correct Internet Plan is assigned.
Test an invalid room or guest name and confirm that access is rejected.
Test plan selection or upgrade when enabled.
Test paid plan room posting when applicable.
Confirm that the user session appears correctly in WiFi Hotspot.
Also test Autologin when it is enabled for the selected Internet Plan.