
Free Access
Free Access allows guests to connect to WiFi without purchasing an Internet Plan.
You can provide simple click-through access, require a keyword, collect selected customer information, and optionally verify the visitor's phone number or email address before granting full Internet access.
Add Free Access to a Splash Page
To add Free Access:
Open Splash Pages.
Select the Splash Page you want to edit.
Open the Login tab.
Click Logins.
Locate Free Access.
Click Add.
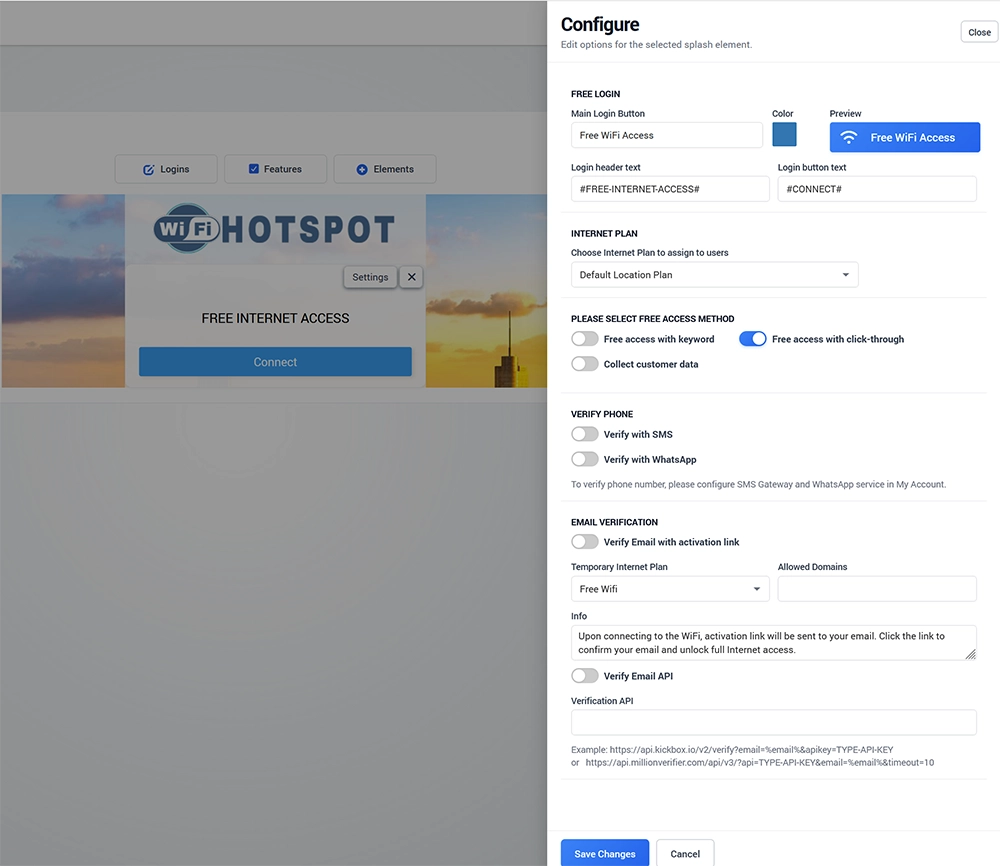
Open Settings to configure the login method.
Click Save Changes.
Save the Splash Page.
Main Login Button
Use Main Login Button to define the text displayed on the button that opens Free Access.
For example:
Free WiFi Access
You can also select the button color and review the result in the Preview area.
Login Header and Button Text
The Free Access form allows you to customize the text displayed to visitors.
Available fields include:
Login header text
Login button text
WiFi Hotspot can use predefined language labels such as:
#FREE-INTERNET-ACCESS##CONNECT#
Using predefined labels allows supported translations to be displayed automatically.
Replace them with custom text when you need specific wording for this Splash Page.
Internet Plan
Select the Internet Plan that will be assigned to users who connect through Free Access.
The selected plan determines the access conditions, such as:
Internet usage time
Account validity
Download and upload speed
Bandwidth limits
Device limits
Other configured plan restrictions
Create or modify Internet Plans under Setup → Internet Plans.
Select a Free Access Method
Free Access can be configured using different access methods.
Free Access with Click-Through
Free access with click-through provides the simplest guest WiFi experience.
The visitor opens the Free Access form and clicks the configured button to continue.
No keyword is required.
This option is useful when you want to provide straightforward complimentary WiFi access with minimum interaction.
Free Access with Keyword
Enable Free access with keyword when visitors should enter a predefined keyword before receiving access.
This can be useful when a keyword is provided:
At reception
On a receipt
At an event
To hotel or restaurant guests
To a specific customer group
Configure the required keyword according to the access policy for the location.
Collect Customer Data
Enable Collect customer data when information should be collected before Free Access is granted.
Depending on the configuration, you can request selected visitor details such as contact or profile information.
Enable only the fields required for your WiFi service and avoid collecting information that is not necessary.
Free Access can also be combined with Splash Page features such as Terms of Use and Contact Permission when required.
Verify Phone Number
Free Access can optionally verify the visitor's phone number before completing the WiFi login process.
Available verification methods include:
Verify with SMS
Verify with WhatsApp
Verify with SMS
Enable Verify with SMS when a verification message should be sent to the visitor's mobile phone through the configured SMS service.
An SMS gateway must first be configured under:
My Account → SMS
Verify with WhatsApp
Enable Verify with WhatsApp when phone verification should use the configured WhatsApp service.
WhatsApp must first be configured under:
My Account → WhatsApp
After configuring the communication service, test phone verification from a real guest device before using it in production.
Email Verification
Free Access can also require email verification.
Two verification methods are available:
Verify Email with activation link
Verify Email API
Verify Email with Activation Link
Enable Verify Email with activation link when the visitor must confirm the supplied email address before receiving full Internet access.
The typical process is:
The visitor enters an email address.
WiFi Hotspot temporarily allows the access required to complete verification.
An activation link is sent to the supplied email address.
The visitor opens the activation link.
The email address is confirmed.
Full Internet access is enabled according to the main Internet Plan.
Temporary Internet Plan
Email activation requires a Temporary Internet Plan so the visitor has enough limited connectivity to access the verification message before full Internet access is granted.
Create a dedicated temporary plan under Setup → Internet Plans.
The temporary plan should provide only the access required to complete the verification process and should have a short time and expiration period.
A period of at least a few minutes is generally recommended so the visitor has enough time to receive and open the activation email.
The Temporary Internet Plan is used only during verification and should not replace the main Free Access Internet Plan.
Allowed Domains
Use Allowed Domains when specific destinations must remain available while the visitor is using the Temporary Internet Plan.
Only add domains required for the email-verification workflow.
Avoid allowing unnecessary domains, because anything available during the temporary access period may be reachable before full authentication is completed.
Verification Info Message
Use Info to explain the verification process to visitors.
For example:
Upon connecting to the WiFi, an activation link will be sent to your email. Click the link to confirm your email and unlock full Internet access.
Keep the message short and explain clearly what the visitor needs to do next.
Verify Email API
Enable Verify Email API when you want to validate email addresses through an external email-verification service.
Enter the required endpoint in Verification API.
The interface supports a URL-based API request where the visitor's email address can be passed to the verification service.
The exact API format, API key, response, and verification rules depend on the external provider you use.
Services such as Kickbox or MillionVerifier are examples of email-verification providers, but always follow the current API documentation of your selected service.
Do not expose API credentials in public Splash Page content.
Choosing the Right Free Access Method
Use the simplest method that meets your access requirements.
For example:
Click-through – Fast complimentary guest WiFi.
Keyword – Access restricted to visitors who received a shared keyword.
Collect customer data – Free access with selected registration information.
Phone verification – Confirm that the supplied mobile number can receive SMS or WhatsApp messages.
Email activation – Confirm ownership of the supplied email address.
Email Verification API – Validate email addresses through an external verification service.
Several options can be combined when required, but avoid making the guest WiFi login process unnecessarily complicated.
Test Free Access
After configuring Free Access:
Click Save Changes.
Save the Splash Page.
Connect a test device to the guest WiFi network.
Select Free WiFi Access.
Test the configured click-through, keyword, or data collection process.
Verify that the correct Internet Plan is assigned.
Test SMS or WhatsApp verification when enabled.
Test the email activation link when enabled.
Verify the Temporary Internet Plan and Allowed Domains.
Test the Email Verification API when used.
Complete authentication.
Confirm that full Internet access is available.
Verify the resulting user session in the WiFi Hotspot dashboard.
Test all enabled verification methods before making the Splash Page available to guests.