
Create and Configure a Splash Page
The Splash Page is the guest-facing portal displayed when visitors connect to your WiFi network.
WiFi Hotspot includes a visual Splash Page editor that allows you to create branded login pages, choose how guests authenticate, add additional features and content, configure welcome and advertising screens, and control what happens after a successful login.
Create a New Splash Page
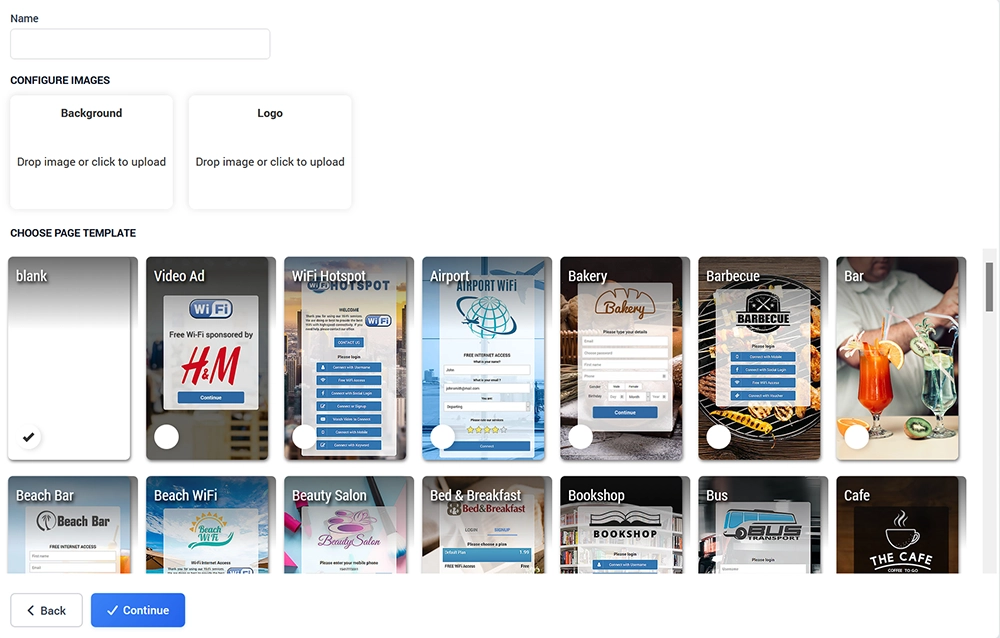
To create a new Splash Page:
Open Splash Pages.
Click Add Page.
Enter a Name for the new Splash Page.
Upload a Background image when required.
Upload your Logo.
Select one of the available page templates or choose Blank to start from an empty page.
Click Continue.
Templates provide a starting design that can be customized later in the Splash Page editor.
Splash Page Editor
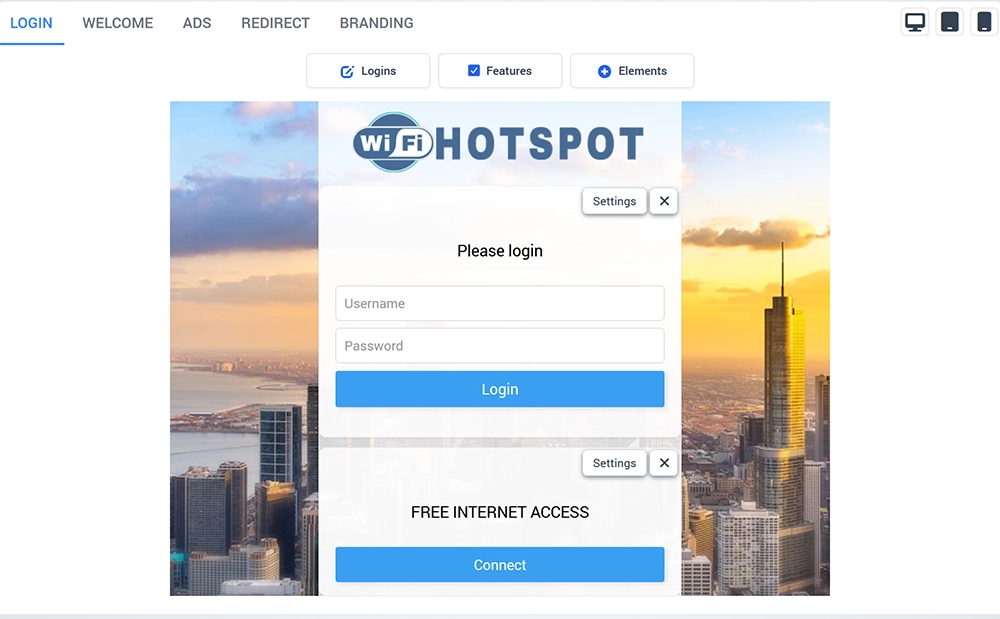
The Splash Page editor is organized into five main sections:
Login
Welcome
Ads
Redirect
Branding
Use Preview to review the page before publishing changes and Save to store the current configuration.
Desktop, tablet, and mobile preview controls allow you to check how the page will appear on different types of guest devices.
Login
The Login section controls how visitors access the WiFi network and what additional information or content appears during the login process.
Three configuration panels are available:
Logins
Features
Elements
Login Methods
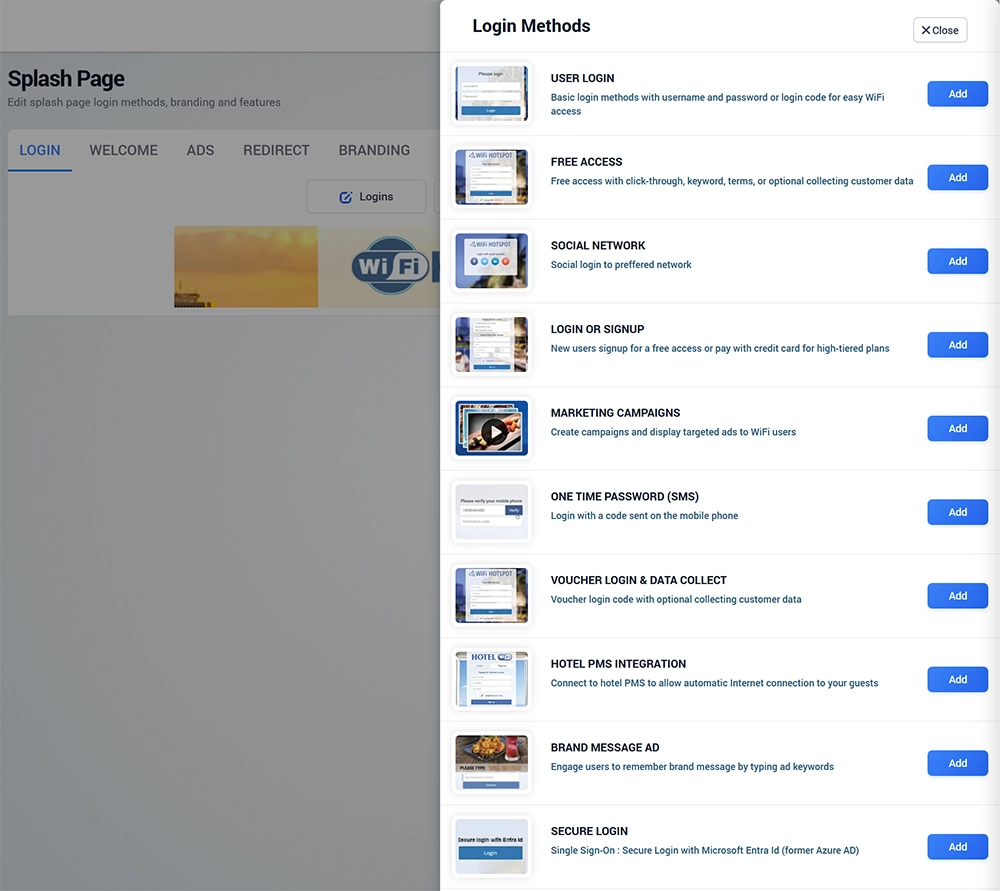
Click Logins to choose how guests can access the WiFi network.
Multiple login methods can be added when you want to give visitors more than one access option.
Available methods include:
User Login
Allow existing users to log in with a username and password or login code.
Free Access
Provide free Internet access using click-through, a keyword, or optional customer data collection. Terms of Use and Contact Permission can be added separately under Features.
Social Network
Allow visitors to authenticate using a supported social login provider.
Available social login options depend on the configured social applications and provider requirements.
Login or Signup
Allow existing users to log in while new visitors can create an account.
Signup can be combined with free access or paid Internet Plans.
Marketing Campaigns
Display targeted marketing content or advertisements as part of the WiFi access process.
One-Time Password (SMS)
Authenticate visitors using a verification code sent to their mobile phone.
An SMS gateway must be configured before SMS authentication can be used.
Voucher Login & Data Collection
Allow guests to access WiFi using a voucher code.
Optional user information can also be collected as part of the voucher login process.
Hotel PMS Integration
Connect guest WiFi access with a supported hotel Property Management System.
Guests can authenticate using hotel information such as their room and name, depending on the PMS integration.
Brand Message Ad
Ask visitors to interact with a brand message before receiving Internet access.
This can be used to increase awareness of a promotion, message, or campaign.
Secure Login
Secure authentication with Microsoft Entra ID, Google Workspace Secure LDAP, Push Notification, or QR Login.
For advanced configuration, use the dedicated guide for the selected login method.
Add and Configure Login Methods
To add a login method:
Open the Login tab.
Click Logins.
Find the required login method.
Click Add.
Configure the Internet Plan and other available settings.
Save the login method.
Repeat the process when multiple login options should appear on the same Splash Page.
Features
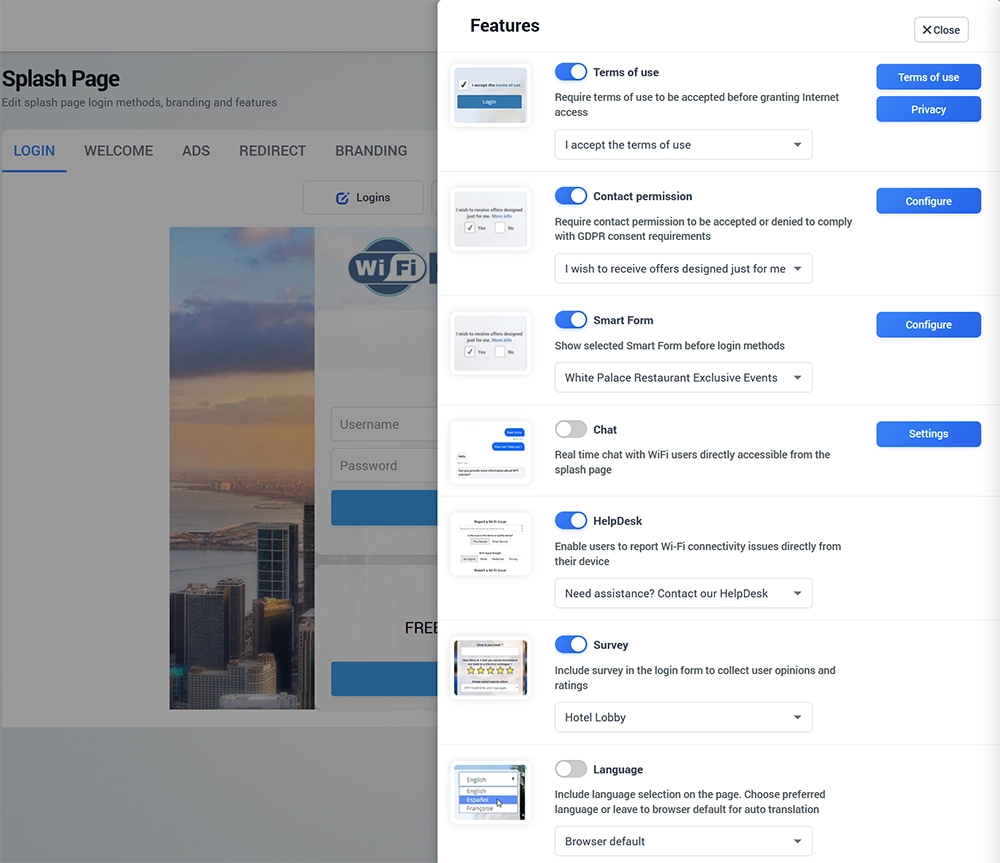
Click Features to add additional functionality to the guest login experience.
Terms of Use
Enable Terms of Use when guests should accept your service terms before receiving Internet access.
You can select an existing Terms of Use text or configure your own.
Use the Privacy option when you need to provide visitors with additional privacy information.
Contact Permission
Enable Contact Permission when visitors should be able to provide or decline permission for marketing communication.
Configure the consent message according to your privacy policy and applicable data protection requirements.
Contact Permission should be treated separately from the Terms of Use required for WiFi access.
Smart Form
Enable Smart Form to display a selected form before the available login methods.
Smart Forms can be used when additional information needs to be collected from visitors as part of the WiFi experience.
Select the required Smart Form from the available list.
Chat
Enable Chat to provide real-time communication with WiFi visitors directly from the Splash Page.
Click Settings to configure the Chat service.
HelpDesk
Enable HelpDesk to allow visitors to report WiFi connectivity problems directly from their device.
The submitted issue becomes available in the WiFi Hotspot Help Desk, where administrators can review the ticket and available user, device, hotspot, and location information.
Survey
Enable Survey when you want to collect visitor feedback during the WiFi login process.
Select one of the previously created surveys from the available list.
Survey responses can later be reviewed through the survey reports and statistics.
Language
Enable Language when visitors should be able to select the preferred language for the Splash Page.
You can also leave the setting at Browser default so that the appropriate language can be selected automatically when supported.
Elements
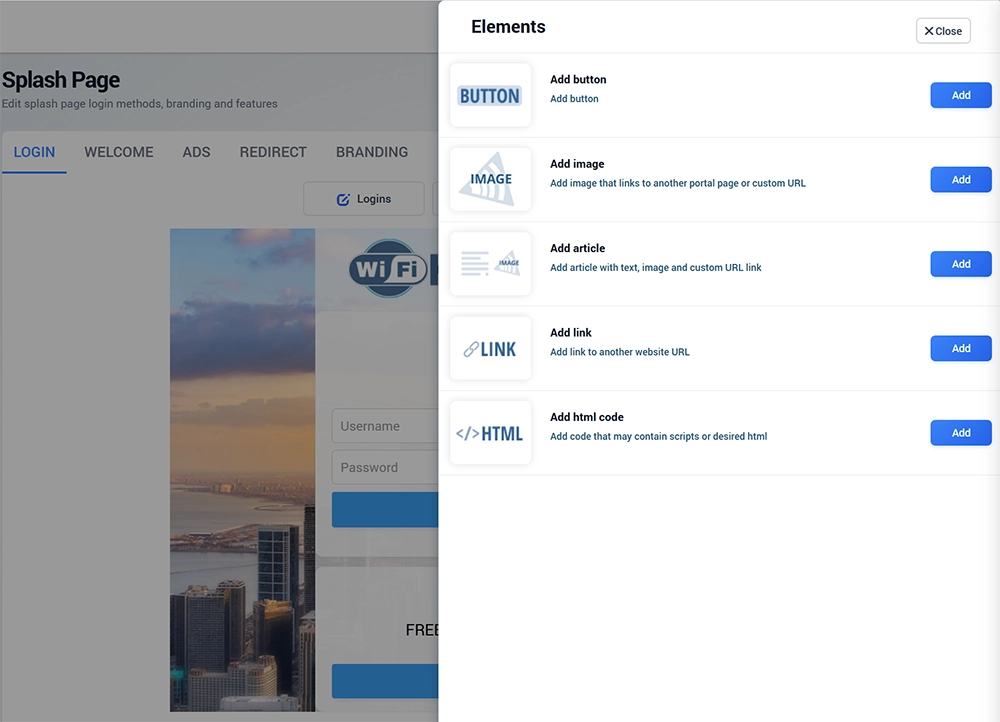
Click Elements when you want to add additional content to the Login Page.
Available elements include:
Button
Image
Article
Link
HTML code
Add Button
Use Add button to place an additional call-to-action on the Splash Page.
A button can link to another page, service, or external URL.
Configure the button text, destination, and appearance according to the purpose of the link.
Add Image
Use Add image to display an additional image on the Splash Page.
The image can also be configured to link to another portal page or external URL.
Add Article
Use Add article when you need to display a combination of text, an image, and an optional link.
This can be useful for promotions, hotel information, events, services, or other visitor content.
Add Link
Use Add link to create a simple text link to another website or destination.
Add HTML Code
Use Add HTML code when custom HTML or supported scripts need to be included on the page.
Only add code from trusted sources. Custom HTML or scripts can affect Splash Page appearance and behavior.
Preview the Splash Page
Before saving a new or modified Splash Page, use Preview to review the complete design.
Check the available device views to verify how the page appears on:
Desktop
Tablet
Mobile
Pay particular attention to:
Logo and background
Button visibility
Login forms
Terms and consent text
Additional elements
Page scrolling
Advertising screens
Welcome Page
Redirect behavior
A Splash Page should be easy to use on a mobile phone because most guest WiFi sessions begin on mobile devices.
Save and Test
After completing the configuration, click Save.
Always perform a real guest WiFi test before making the Splash Page available to visitors:
Connect a test device to the guest WiFi network.
Confirm that the correct Splash Page appears.
Test every login method that guests will be able to use.
Verify Terms of Use and Contact Permission when enabled.
Test Smart Forms, HelpDesk, Survey, Chat, and Language when used.
Review additional Elements and links.
Complete the login process.
Verify Ads and Welcome Page behavior.
Confirm the final redirect.
Check that the session appears correctly in the WiFi Hotspot dashboard.
Repeat the test on at least one mobile device before using the Splash Page in production.