
Payments
Payments allow you to sell WiFi Internet access directly through the guest Splash Page.
By connecting a supported payment gateway to WiFi Hotspot, visitors can select a paid Internet Plan, complete the payment, and receive Internet access according to the limits configured for the purchased plan.
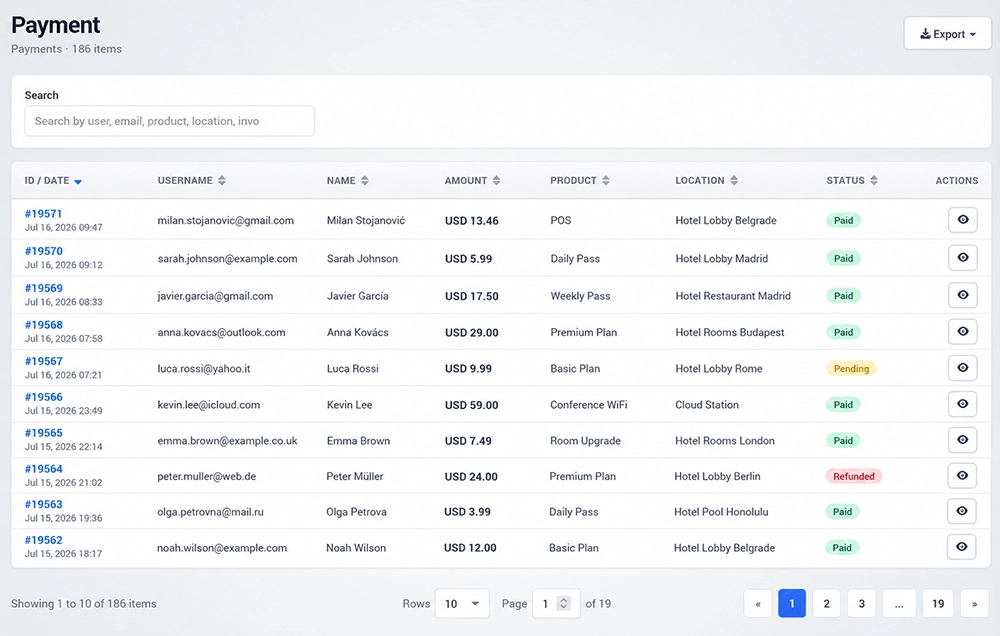
How Paid WiFi Works
A typical paid WiFi process is:
The visitor connects to the guest WiFi network.
The Splash Page opens.
The visitor selects an available paid Internet Plan.
The configured payment gateway processes the payment.
After successful payment, the corresponding WiFi account and access rights are activated.
The visitor receives Internet access according to the selected plan.
The Internet Plan determines the price and access conditions, while the payment gateway handles the payment transaction.
Before Configuring Payments
Before enabling paid WiFi, make sure that:
At least one Internet Plan is configured.
The Internet Plan has the required price.
The plan has the correct time, bandwidth, speed, expiration, and device limits.
A merchant account is available with the payment provider you want to use.
The guest Splash Page is configured to offer paid access.
The required payment gateway domains are accessible through the captive portal when required.
Different payment providers require different credentials and network configuration, so always use the instructions for the selected gateway.
Payment Gateways
Open the Payment Gateway panel to view the payment gateways configured in your WiFi Hotspot account.
You can configure one or more supported payment integrations depending on your business requirements and available payment providers.
WiFi Hotspot supports different types of payment services, including card payments and regional payment platforms.
The exact configuration fields depend on the selected payment gateway.
Add a Payment Gateway
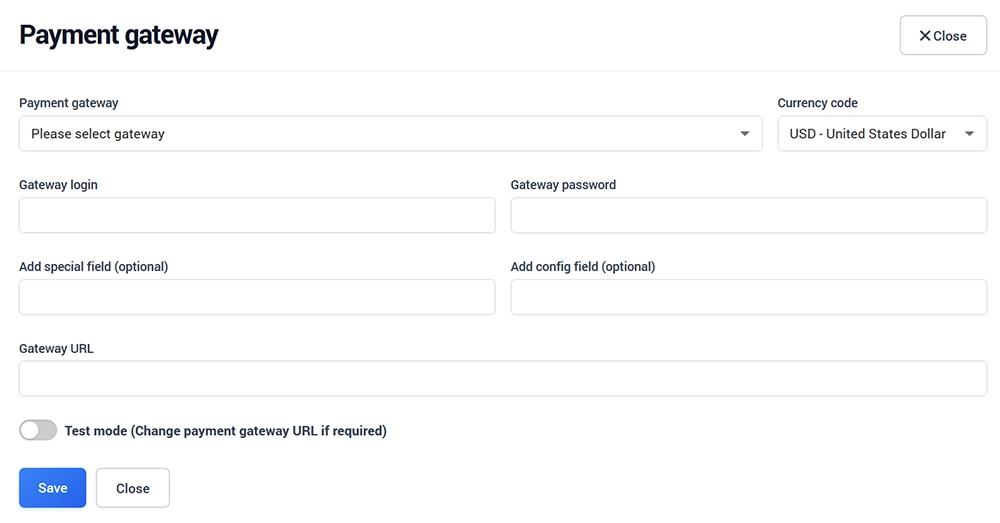
To configure a new payment gateway:
Open Setup → Payments.
Click New Payment Gateway.
Select the required payment gateway from the list.
Enter the required merchant or account credentials.
Select or enter the appropriate currency when required.
Configure any additional gateway-specific fields.
Save the payment gateway.
Depending on the provider, required information may include:
API key
Secret key
Client ID
Client Secret
Merchant ID
Account credentials
Currency
Gateway URL
Additional integration parameters
Only enter credentials generated for your own merchant account.
Configure the Internet Plan
Paid WiFi requires an Internet Plan with a price.
Open Setup → Internet Plans and configure the plan that visitors will purchase.
Depending on your service, you can define:
Price
Available Internet time
Account validity
Bandwidth quota
Download speed
Upload speed
Number of devices
Hotspot restrictions
Other available access limits
For example, you can offer separate plans for hourly, daily, weekly, or premium Internet access.
Save the Internet Plan before making it available on the Splash Page.
Add Paid Access to the Splash Page
After the payment gateway and Internet Plans are configured, make the paid plans available through the appropriate Splash Page login or signup method.
The visitor should be able to:
Open the Splash Page.
Review the available Internet Plans.
Select the required plan.
Enter the information required for signup or payment.
Continue to the payment provider.
Complete the payment.
Receive Internet access.
Keep plan names, prices, and access limits clear so visitors understand what they are purchasing before starting the payment process.
Payment Gateway Whitelist
Some payment integrations require specific domains to be available before the visitor is authenticated.
These domains must be added to the router, access point, gateway, or controller whitelist or walled garden where required.
The required domains differ between payment providers.
Use the dedicated configuration instructions for the selected payment gateway and add only the domains required by that integration.
After changing the whitelist, test the complete payment process from a device that is not already authenticated.
Test the Payment Process
Always test paid WiFi before making it available to visitors.
Connect a test device to the guest WiFi network.
Confirm that the Splash Page opens.
Select a paid Internet Plan.
Verify that the correct price and plan are displayed.
Continue to the payment gateway.
Complete the transaction using the provider's supported test or sandbox environment when available.
Confirm that the payment is accepted.
Verify that the correct Internet Plan is assigned.
Confirm that Internet access is available.
Check that time, bandwidth, speed, expiration, and device limits are applied correctly.
Verify that the payment and user session are recorded in WiFi Hotspot.
After successful testing, switch to the production credentials and settings required by your payment provider.
Never use test credentials for live customer payments.
Stripe Payments
Stripe can be configured as one of the available payment gateways.
When using Stripe, enter the Stripe account-specific credentials required by the selected Stripe integration and configure the appropriate currency.
WiFi Hotspot also supports Stripe-based automatic billing for Internet Plans configured as subscriptions.
Use the dedicated Stripe configuration guide for the exact setup procedure and required credentials.
PayPal Payments
PayPal can also be used for paid WiFi access when configured as the payment gateway.
PayPal provides a sandbox environment that can be used to test the payment process before using the live merchant account.
Other Payment Gateway Integrations
WiFi Hotspot supports multiple payment gateway integrations for different countries and regions.
Each provider may require different:
Merchant credentials
Currencies
API settings
Callback settings
Whitelisted domains
Additional configuration fields
Always follow the dedicated instructions for the gateway you intend to use.
Do not copy configuration values from another payment provider, as gateway requirements are different.
Monitor Revenue
After paid WiFi becomes active, use Analytics → Revenue to monitor income generated through the WiFi service.
Revenue analytics can be used to review:
Revenue by location
Revenue by date
Revenue by Internet Plan or product
Total revenue for the selected period
This makes it possible to compare paid WiFi performance across different locations and plans.
Troubleshooting Payments
If a visitor cannot complete a payment, first determine where the process stops.
Payment Page Does Not Open
Check that:
The guest device has reached the correct Splash Page.
The correct payment gateway is selected.
Required payment provider domains are included in the whitelist or walled garden.
DNS resolution is working correctly.
The captive portal is not blocking required payment resources.
Payment Is Rejected
Check:
Merchant account status
Gateway credentials
Test versus production credentials
Currency configuration
Required API or merchant settings
The payment provider may also provide additional information about declined or rejected transactions.
Payment Succeeds but Internet Access Is Not Granted
Verify that:
The correct Internet Plan is active.
The payment is associated with the expected plan.
The user account was created or activated correctly.
The plan has valid access limits.
Authentication between the hotspot and WiFi Hotspot is working correctly.
Also check the user session and payment information in the dashboard to determine whether the issue occurred during payment processing or WiFi authentication.
Security Recommendations
Keep payment gateway credentials private and provide access only to authorized administrators.
Do not place secret keys or merchant credentials in Splash Page content or other publicly accessible pages.
Use the payment provider's test or sandbox environment whenever available before enabling live transactions, and replace test credentials with the correct production credentials only after the complete payment flow has been verified.