 YunCore
Please select a model and download HotspotOS.
DownloadHotspotOSConfigurationTroubleshoot
Start your browser and in URL field type http://10.200.0.1:8089/ to login to HotspotOS.
Username: admin
Password: admin

Press the Login button to access to Status tab.
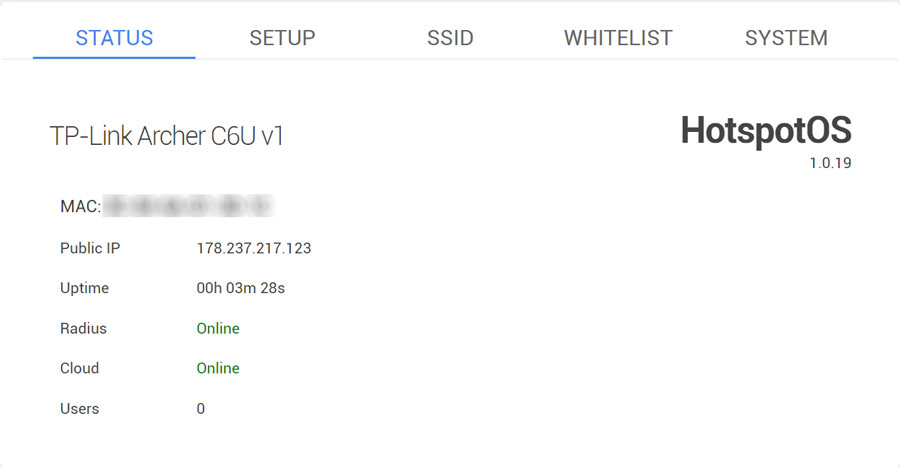
On the HotSpotOS Status page, you can check AP MAC address, Public IP, device Uptime, Radius and Cloud status, and a number of users connected to AP.
The MAC address of your AP will be used in the SignUp process.
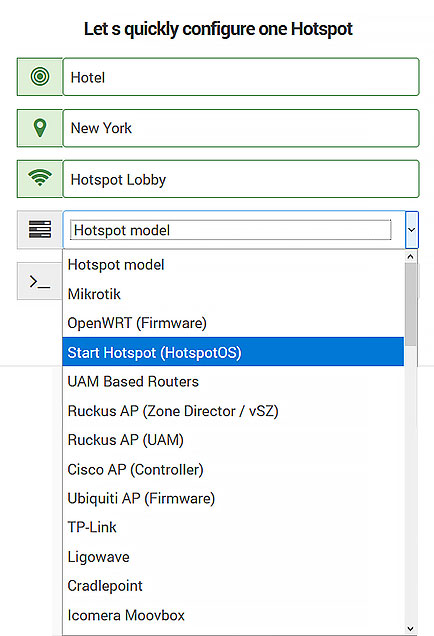
During SignUp, after typing HotSpot name, select as HotSpot model HotspotOS, and add your MAC address from the Status tab.
From the Setup page configure your AP.
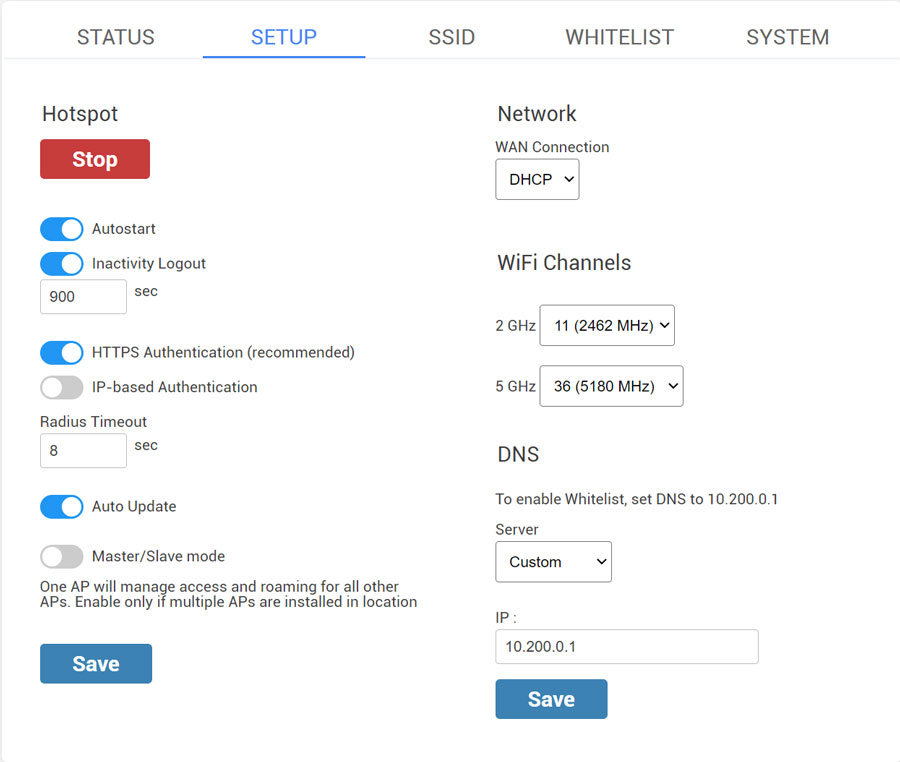
The Hotspot is started and the Autostart and Inactivity Logout options are active by default.
Inactivity Logout is set to 900 sec. Inactivity period defines how long will the device stay logged-in without activity. This prevents repeated logins if the connection temporarily breaks.
IP-based Authentication is used to switch AP domain ap.wifihotspot.io to 10.200.0.1
It is recommended to disable this option to avoid issues with https-based websites.
Radius Timeout – 8sec
Auto Update – enabled
Master/Slave mode
One AP will manage access and roaming for all other APs.
Enable only if multiple APs are installed in a location.
By default as Network WAN Connection is set DHCP, but you can choose network protocol based on your needs. Our recommendation is to use DHCP Network Protocol.
WiFi channels – Eleven channels are designated in the 2 GHz range, spaced 5 MHz apart from each other. Those eleven channels in the spectrum are allowed anywhere in the world.
DNS – Custom
IP – 10.200.0.1
Save changes.
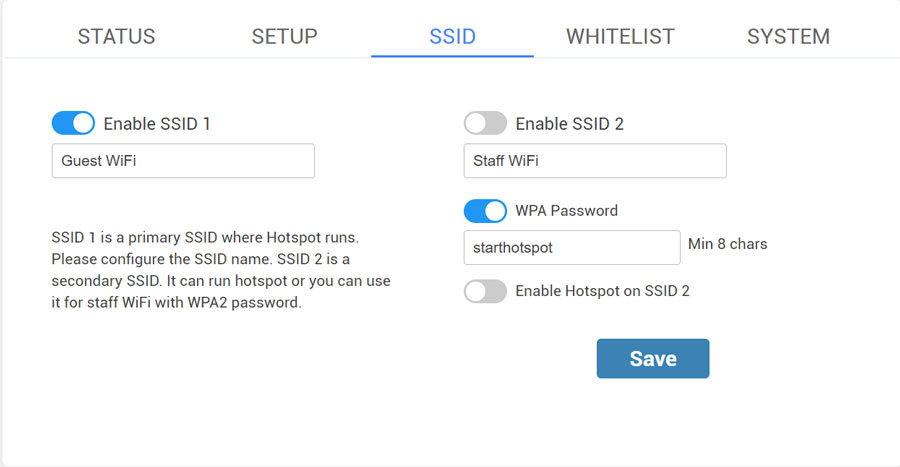
From the SSID tab, you can Enable SSID 1 and 2.
Configure the SSID name and enable it.
Secondary SSID 2 is mostly used for staff WiFi with WPA2 password but you can also enable Hotspot on it.
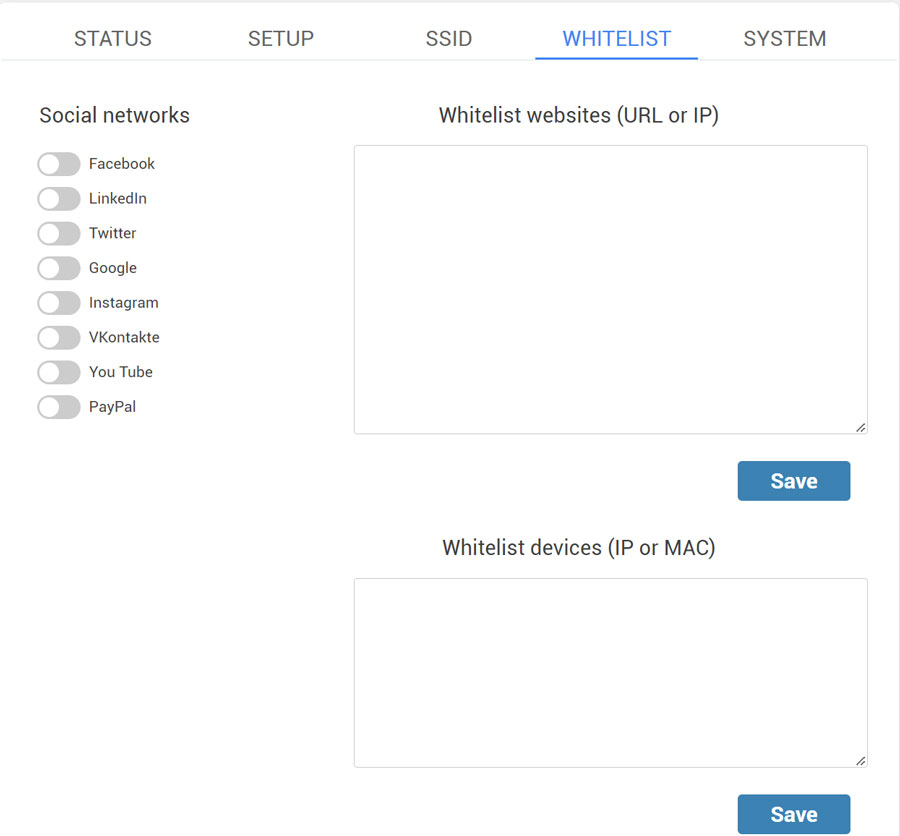
If you want to use Social network login feature or Paypal as payment gateway, enable it on the Whitelist tab and Save changes.
You can also whitelist websites based on URL, IP, or MAC.
From the System tab, you can flash HotspotOS image and change the Admin password.
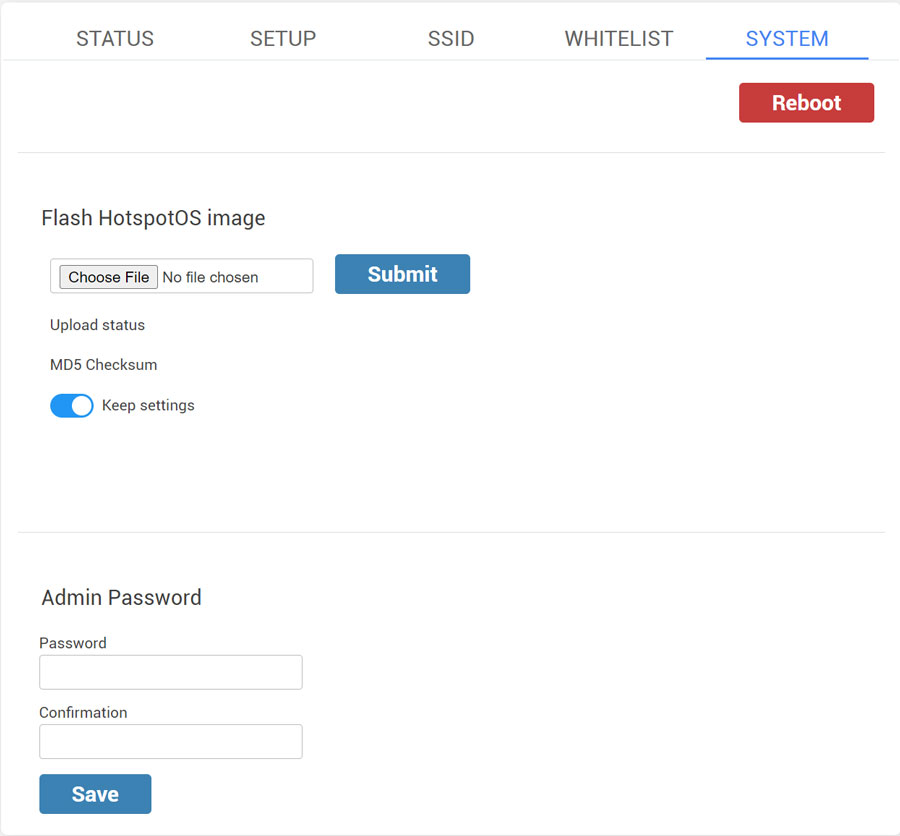
When you finish setup, restart the AP / WiFi router to apply changes.
YunCore HotspotOS Download
YunCore CPE830
Download HotspotOS
CPE830 is a clone of AP90Q, with different type of antenna (panel) and additional 4 LEDs for WiFi signal level indication.
Flash instruction under U-Boot, using UART:
1. tftp 0x80060000 hotspotos-ar71xx-generic-ap90q-squashfs-sysupgrade
2. erase 0x9f050000 +$filesize
3. cp.b $fileaddr 0x9f050000 $filesize
4. setenv bootcmd “bootm 0x9f050000”
5. saveenv && reset
Flash instruction under vendor fimrware, using telnet/SSH:
1. Connect PC with 192.168.1.x address to WAN port
2. Power up device, enter failsafe mode with button (no LED indicator!)
3. Change root password and reboot (mount_root, passwd …, reboot -f)
4. Upload hotspotos-ar71xx-generic-ap90q-squashfs-sysupgrade.bin to /tmp using SCP
5. Connect PC with 192.168.188.x address to LAN port, SSH to 192.168.188.253
6. Invoke:
– cd /tmp
– fw_setenv bootcmd “bootm 0x9f050000”
– mtd erase firmware
– mtd -r write hotspotos-ar71xx-generic-ap90q-squashfs-sysupgrade.bin firmware
YunCore CPE870
Download HotspotOS
Flash instruction (do it under U-Boot, using UART):
1. tftp 0x80060000 hotspotos-ar71xx-generic-cpe870-squashfs-sysupgrade.bin
2. erase 0x9f020000 +$filesize
3. cp.b $fileaddr 0x9f020000 $filesize
4. setenv bootcmd “bootm 0x9f020000”
5. saveenv && reset
Vendor firmware access (login/password): Admin/5up
YunCore SR3200
Download HotspotOS
Flash instruction under vendor firmware, using telnet/SSH:
1. If your firmware does not have root password, go to point 5
2. Connect PC with 192.168.1.x address to LAN or WAN port
3. Power up device, enter failsafe mode with button (no LED indicator!)
4. Change root password and reboot (mount_root, passwd …, reboot -f)
5. Upload hotspotos-ar71xx-…-sysupgrade.bin to /tmp using SCP
6. Connect PC with 192.168.188.x address to LAN port, SSH to 192.168.188.253
7. Invoke:
– cd /tmp
– fw_setenv bootcmd “bootm 0x9fe80000 || bootm 0x9f050000”
– mtd -e firmware -r write lede-ar71xx-…-sysupgrade.bin firmware
Flash instruction under U-Boot, using UART:
1. tftp 0x80060000 hotspotos-ar71xx-…-sysupgrade.bin
2. erase 0x9f050000 +$filesize
3. cp.b $fileaddr 0x9f050000 $filesize
4. setenv bootcmd “bootm 0x9fe80000 || bootm 0x9f050000”
5. saveenv && reset
Known Issues
LED for 5 GHz WLAN is currently not supported on both devices as it is connected directly to the QCA9882 radio chip.
YunCore XD3200 v5.3
Download HotspotOS
Flash instruction under vendor firmware, using telnet/SSH:
1. If your firmware does not have root password, go to point 5
2. Connect PC with 192.168.1.x address to LAN or WAN port
3. Power up device, enter failsafe mode with button (no LED indicator!)
4. Change root password and reboot (mount_root, passwd …, reboot -f)
5. Upload hotspotos-ar71xx-…-sysupgrade.bin to /tmp using SCP
6. Connect PC with 192.168.188.x address to LAN port, SSH to 192.168.188.253
7. Invoke:
– cd /tmp
– fw_setenv bootcmd “bootm 0x9fe80000 || bootm 0x9f050000”
– mtd -e firmware -r write lede-ar71xx-…-sysupgrade.bin firmware
Flash instruction under U-Boot, using UART:
1. tftp 0x80060000 hotspotos-ar71xx-…-sysupgrade.bin
2. erase 0x9f050000 +$filesize
3. cp.b $fileaddr 0x9f050000 $filesize
4. setenv bootcmd “bootm 0x9fe80000 || bootm 0x9f050000”
5. saveenv && reset
LED for 5 GHz WLAN is currently not supported on both devices as it is connected directly to the QCA9882 radio chip.
YunCore AP90Q
Download HotspotOS
Flash instruction under U-Boot, using UART:
1. tftp 0x80060000 hotspotos-ar71xx-generic-ap90q-squashfs-sysupgrade
2. erase 0x9f050000 +$filesize
3. cp.b $fileaddr 0x9f050000 $filesize
4. setenv bootcmd “bootm 0x9f050000”
5. saveenv && reset
Flash instruction under vendor fimrware, using telnet/SSH:
1. Connect PC with 192.168.1.x address to WAN port
2. Power up device, enter failsafe mode with button (no LED indicator!)
3. Change root password and reboot (mount_root, passwd …, reboot -f)
4. Upload hotspotos-ar71xx-generic-ap90q-squashfs-sysupgrade.bin to /tmp using SCP
5. Connect PC with 192.168.188.x address to LAN port, SSH to 192.168.188.253
6. Invoke:
– cd /tmp
– fw_setenv bootcmd “bootm 0x9f050000”
– mtd erase firmware
– mtd -r write hotspotos-ar71xx-generic-ap90q-squashfs-sysupgrade.bin firmware
YunCore T830
Download HotspotOS
1. First, gain root access to the device, following below steps:
– Login into web gui (default password/IP: admin/192.168.188.253).
– Go to “Advanced” -> “Management” -> “System” and download backup of
configuration (bakfile.bin).
– Open the file as tar.gz archive, edit/update “shadow” file and change
hash of root password to something known.
– Repack the archive, rename it back to “bakfile.bin” and use to
restore configuration of the device.
– After that, device will reboot and can be accessed over SSH.
2. Then, install HotspotOS:
– Login over SSH and issue command:
fw_setenv bootcmd “bootm 0x9f050000 || bootm 0x9fe80000”
– Upload Hotspotos image and install it (only if previous command
succeeded) with command: “sysupgrade -n -F hotspotos-…”.
YunCore A770
Download HotspotOS
1. First, gain root access to the device, following below steps:
– Login into web gui (default password/IP: admin/192.168.188.253).
– Go to ‘Advanced’ -> ‘Management’ -> ‘System’ and download backup of
configuration (bakfile.bin).
– Open the file as tar.gz archive, edit/update ‘shadow’ file and change
hash of root password to something known.
– Repack the archive, rename it back to ‘bakfile.bin’ and use to
restore configuration of the device.
– After that, device will reboot and can be accessed over SSH.
2. Then, install OpenWrt:
– Login over SSH and issue command:
fw_setenv bootcmd “bootm 0x9f050000 || bootm 0x9fe80000”
– Upload HotspotOS image and install it (only if previous command
succeeded) with command: ‘sysupgrade -n -F hotspotos-…’.
YunCore XD4200
Download HotspotOS
If your device comes with generic QSDK based firmware, you can login
over telnet (login: root, empty password, default IP: 192.168.188.253),
issue first (important!) ‘fw_setenv’ command and then perform regular
upgrade, using ‘sysupgrade -n -F …’ (you can use ‘wget’ to download
image to the device, SSH server is not available):
fw_setenv bootcmd “bootm 0x9f050000 || bootm 0x9fe80000”
sysupgrade -n -F hotspotos-…-yuncore_…-squashfs-sysupgrade.bin
In case your device runs firmware with YunCore custom GUI, you can use
U-Boot recovery mode:
1. Set a static IP 192.168.0.141/24 on PC and start TFTP server with
‘tftp’ image renamed to ‘upgrade.bin’
2. Power the device with reset button pressed and release it after 5-7
seconds, recovery mode should start downloading image from server
(unfortunately, there is no visible indication that recovery got
enabled – in case of problems check TFTP server logs)
YunCore A782
Download HotspotOS
If your device comes with generic QSDK based firmware, you can login
over telnet (login: root, empty password, default IP: 192.168.188.253),
issue first (important!) ‘fw_setenv’ command and then perform regular
upgrade, using ‘sysupgrade-n -F …’ (you can use ‘wget’ to download
image to the device, SSH server is not available):
fw_setenv bootcmd “bootm 0x9f050000 || bootm 0x9fe80000”
sysupgrade -n -F hotspotos-…-yuncore_…-squashfs-sysupgrade.bin
In case your device runs firmware with YunCore custom GUI, you can use
U-Boot recovery mode:
1. Set a static IP 192.168.0.141/24 on PC and start TFTP server with
‘tftp’ image renamed to ‘upgrade.bin’
2. Power the device with reset button pressed and release it after 5-7
seconds, recovery mode should start downloading image from server
(unfortunately, there is no visible indication that recovery got
enabled – in case of problems check TFTP server logs)