1. Home
  2. Devices & Hardware
  3. Fortinet FortiGate

Fortinet FortiGate

This article describes the installation and configuration steps for Fortinet FortiGate 40F device. Similar instructions apply for 60F models. You need FortiOS v5.6 or above in order to proceed.

Connecting

Log in to your FortiGate web interface.

The default URL to access the web UI through the network interface on port1 is:
https://192.168.1.99/

Go to User & Device > RADIUS Servers on the left menu.
Click Create New and configure:

Name: Radius
Primary Server: 13.92.228.228
Primary Shared Secret: (contact our office)
Secondary Server: 13.90.247.200
Secondary Shared Secret: (contact our office)
Authentication Method: Specify
Method: PAP

Click OK to Save.

In the menu click User Groups and Create New.

Name: GuestGroup
Type: Firewall

Under Remote groups click Create New and under Remote Server choose Radius. Click OK to Save.

On the Policy & Objects > IP click Create New > Address.

Category: Address
Name: GuestOnline
Type: IP/Netmask
Subnet / IP Range: 10.1.0.0/255.255.255.0
Interface: any
Show in Address List: Enabled

Click OK to Save.

Next, click Create New > Address again and configure:

Category: Address
Name: wifihotspot.io
Type: FQDN
FQDN: wifihotspot.io

For each domain below you need to do as per above.

wifihotspot.io
cdn.wifihotspot.io
starthotspot.com
cdnhotspot.azureedge.net
cdn.starthotspot.com
t-msedge.net
static.cloudflareinsights.com
13.92.228.228
13.90.247.200
40.117.190.72
40.121.151.4

Under Addresses click Create New > Address Group and configure:

Category: IPv4 Group
Group Name: GuestWhitelist
Members: click the + button and select all the domains you added earlier.

Click OK to Save.

Go to WiFi & Switch Controller > SSID on the left menu.
Click Create New > SSID and configure:

Interface Name: GuestWiFi
Type: WiFi SSID
Traffic Mode: Tunnel to Wireless Controller
Address: 10.1.0.1/255.255.255.0
DHCP Server: Enabled
DNS Server: Specify: 8.8.8.8
SSID: Guest WiFi (or whatever you wish)
Security Mode: Captive Portal
Portal Type: Authentication
Authentication Portal: External: https://wifihotspot.io/login/fortigate
User Groups: GuestGroup
Broadcast SSID: Enabled
Block Intra-SSID Traffic: Enabled
Exempt Destinations/Services: GuestWhitelist

Click OK to Save.

Under IPv4 Policy click Create New and configure:

Name: GuestWiFi
Incoming Interface: Guest WiFi (guestwifi)
Outgoing Interface: wan1 (your WAN connection)
Source: all
Destination Address: GuestWhitelist
Schedule: always
Service: ALL
Action: ACCEPT
Enable this policy: Enabled

Click OK to Save.

Click Create New again and configure:

Name: GuestWiFiOnline
Incoming Interface: Guest WiFi (guestwifi)
Outgoing Interface: wan1 (your WAN connection)
Source: GuestOnline
Destination Address: all
Schedule: always
Service: ALL
Action: ACCEPT
Enable this policy: Enabled

Click OK to Save changes.

Radius Accounting for SSL VPN Users

Configure SSL VPN access for RADIUS users.
Example:
https://docs.fortinet.com

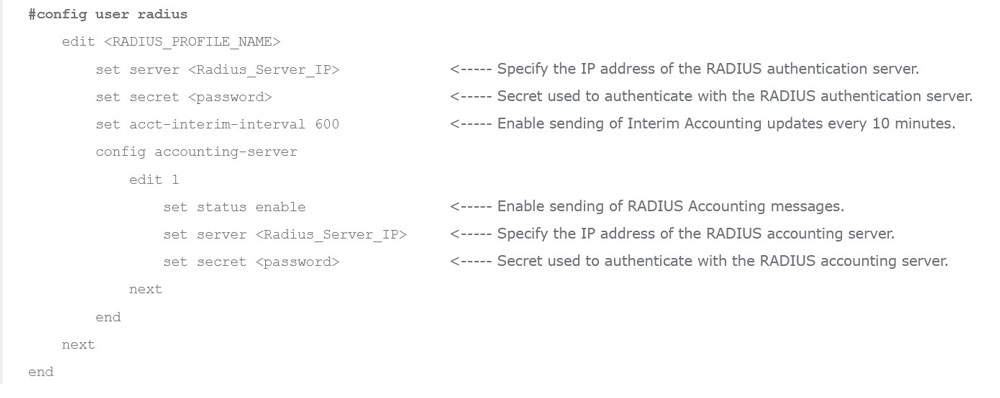
Configure FortiGate to send RADIUS Accounting:

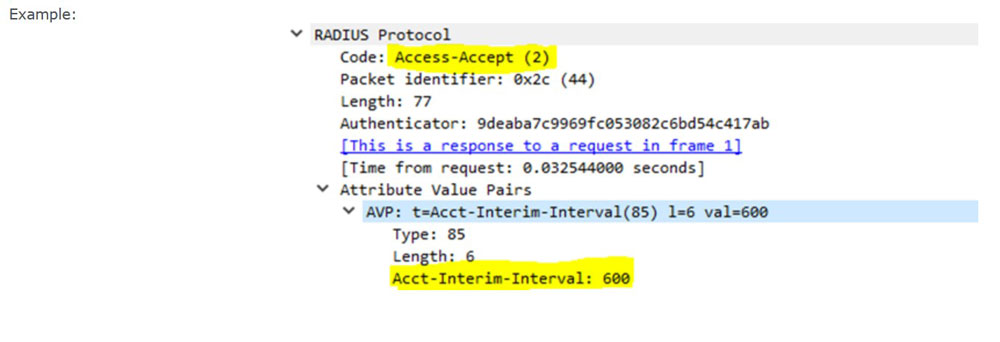
Ensure the RADIUS server is configured to send AVP ‘Acct-Interim-Interval:600’ in the Access-Accept message.

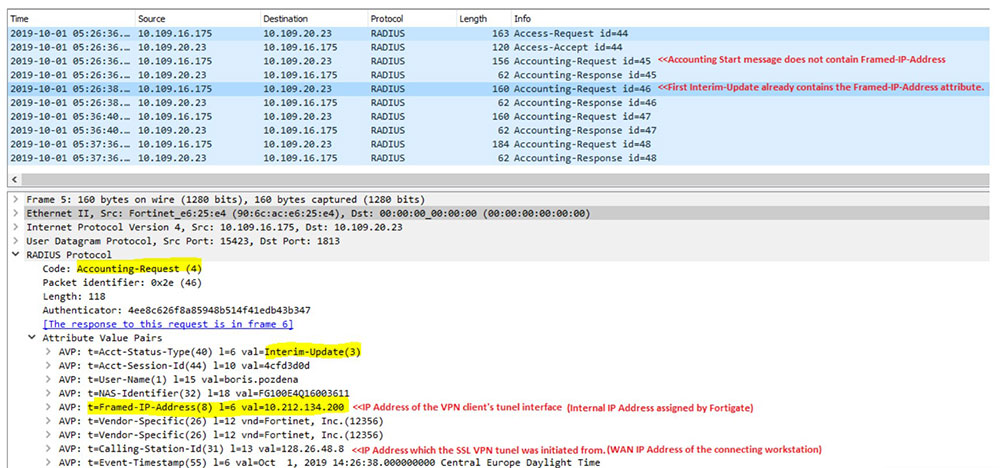
Verification of Configuration:

The bellow packet captures show the effect of the above configuration in action.

Troubleshooting

– Important: Do NOT configure auth-portal address in firewall !  You should configure it only for SSID. This is important to get the redirect parameters such as apmac and similar.

– Note that Fortinet Fortigate doesn’t control bandwidth data limit transfer. Fortinet Fortigate allows control od download / upload or the session time but it doesn’t control bandwidth quota limits.

– In case Fortinet does not apply user limits, please check this document to configure dynamic shaping.

If you need help with configuration, please go to starthotspot.com and contact our tech support. We’ll be glad to help you.

Updated on March 20, 2024

Was this article helpful?