Cisco Meraki

This article describes the installation and configuration steps for Cisco Meraki cloud controller.

Important:

To enable RADIUS accounting for splash pages as well, please contact Cisco Meraki support. This is required to have full functionality enabled – to track user sessions, deduct data and time used, show actual online users and have analytics data.

Failing to do this, user accounts will be created but they will not appear as online nor data and time be deducted during sessions.

Cisco Meraki Customer Support & Documentation

Connecting

Login to your Meraki dashboard: http://dashboard.meraki.com

Go to the Wireless /Splash Page, Splash page section and set:

Custom splash URL: https://wifihotspot.io/login/meraki

Save changes.

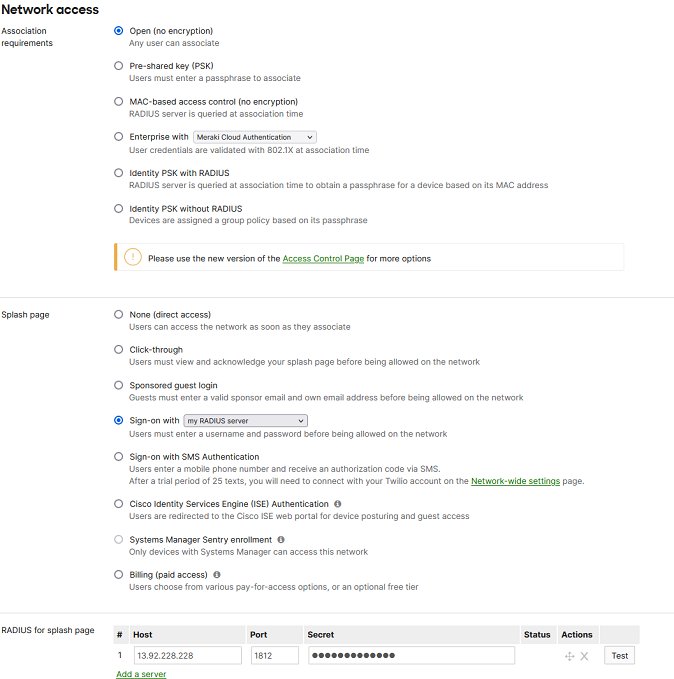
Go to the Wireless/Access Control page.

From Network access section select Open (no encryption).

In the Splash page section select:

Splash page: Sign-on with “my RADIUS server”

In the RADIUS for splash page set:

Host: 13.92.228.228
Port: 1812
Secret:contact our office

Host: 13.90.247.200
Port: 1812
Secret:contact our office

RADIUS accounting: enabled

Host: 13.92.228.228
Port: 1813
Secret:contact our office

Host: 13.90.247.200
Port: 1813
Secret:contact our office

Walled garden: enabled

Walled garden ranges:

13.92.228.228
13.90.247.200
40.117.190.72
wifihotspot.io
cdn.wifihotspot.io
cdnhotspot.azureedge.net
starthotspot.com
cdn.starthotspot.com
t-msedge.net
static.cloudflareinsights.com

Troubleshooting

– Added support for download / upload limit

If you need help with configuration, please go to starthotspot.com and contact our tech support. We’ll be glad to help you.

Updated on March 20, 2024

Was this article helpful?