 AVM FRITZ!
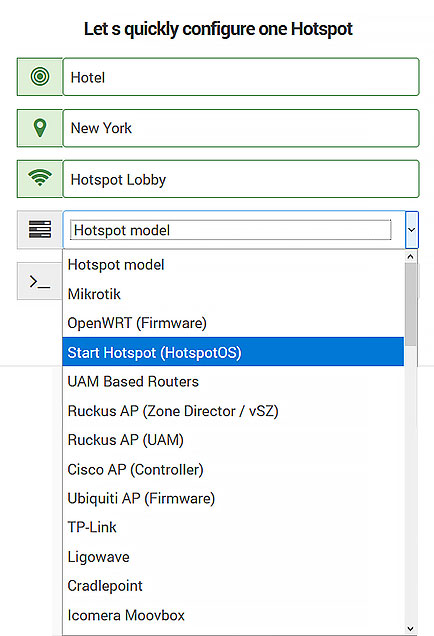
Please select a model and download HotspotOS.
DownloadHotspotOSConfigurationTroubleshoot
Please reset the AP / WiFi router to factory settings to avoid problems with some previous configuration.
Connect your computer to the AVM FRITZ! router web interface.
Go to the Firmware upgrade section.
Navigate to the location where the HotspotOS for your model is downloaded and press Open.
Press the Firmware Update button.
Click Upload to complete the HotspotOS installation.
The HotspotOS installation procedure can take a few minutes.
During this process, you will see information about the processing.
Reconnect LAN cable or Disable/Enable NIC card in order to get new valid IP address in 10.200.0.x range from router.
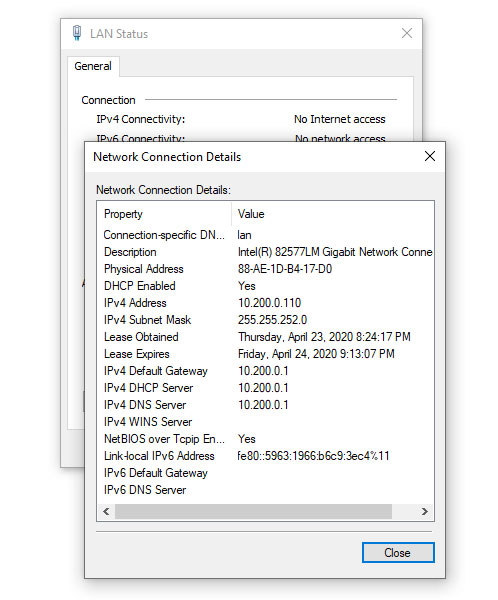
Start your browser and in URL field type http://10.200.0.1:8089/ to login to HotspotOS.
Username: admin
Password: admin

Press the Login button to access to Status tab.
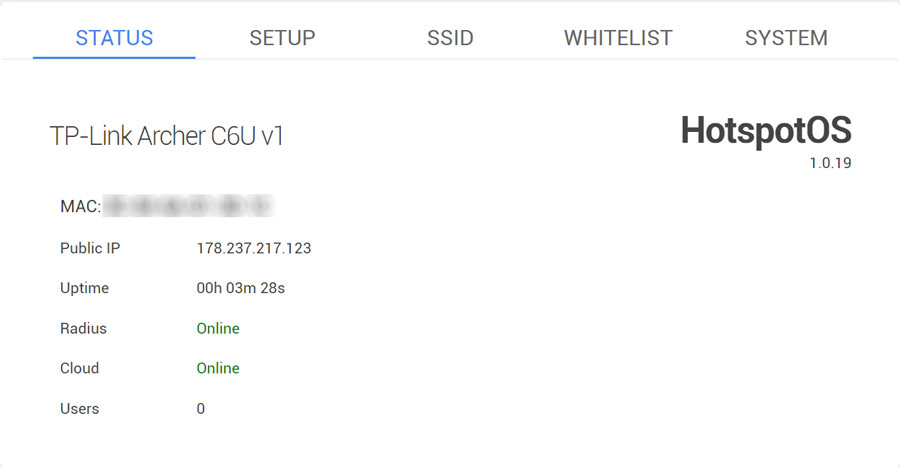
On the HotSpotOS Status page, you can check AP MAC address, Public IP, device Uptime, Radius and Cloud status, and a number of users connected to AP.
The MAC address of your AP will be used in the SignUp process.
During SignUp, after typing HotSpot name, select as HotSpot model HotspotOS, and add your MAC address from the Status tab.
From the Setup page configure your AP.
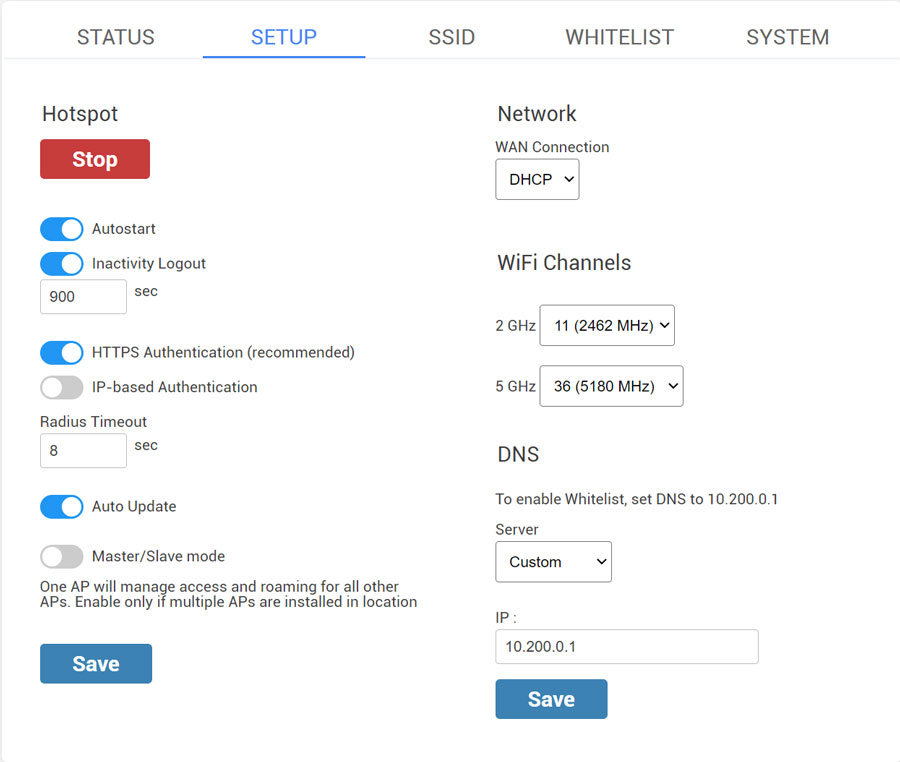
The Hotspot is started and the Autostart and Inactivity Logout options are active by default.
Inactivity Logout is set to 900 sec. Inactivity period defines how long will the device stay logged-in without activity. This prevents repeated logins if the connection temporarily breaks.
IP-based Authentication is used to switch AP domain ap.wifihotspot.io to 10.200.0.1
It is recommended to disable this option to avoid issues with https-based websites.
Radius Timeout – 8sec
Auto Update – enabled
Master/Slave mode
One AP will manage access and roaming for all other APs.
Enable only if multiple APs are installed in a location.
By default as Network WAN Connection is set DHCP, but you can choose network protocol based on your needs. Our recommendation is to use DHCP Network Protocol.
WiFi channels – Eleven channels are designated in the 2 GHz range, spaced 5 MHz apart from each other. Those eleven channels in the spectrum are allowed anywhere in the world.
DNS – Custom
IP – 10.200.0.1
Save changes.
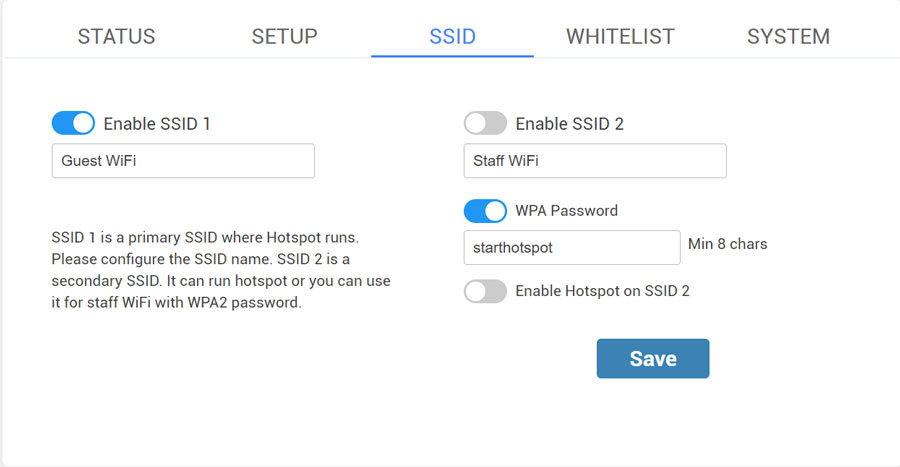
From the SSID tab, you can Enable SSID 1 and 2.
Configure the SSID name and enable it.
Secondary SSID 2 is mostly used for staff WiFi with WPA2 password but you can also enable Hotspot on it.
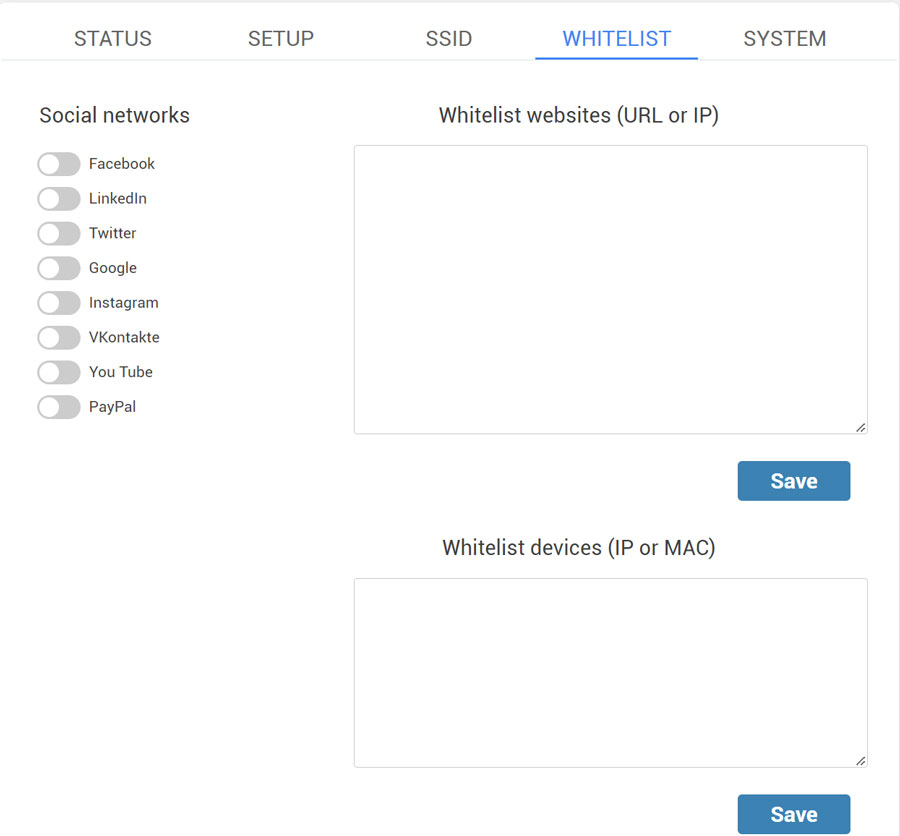
If you want to use Social network login feature or Paypal as payment gateway, enable it on the Whitelist tab and Save changes.
You can also whitelist websites based on URL, IP, or MAC.
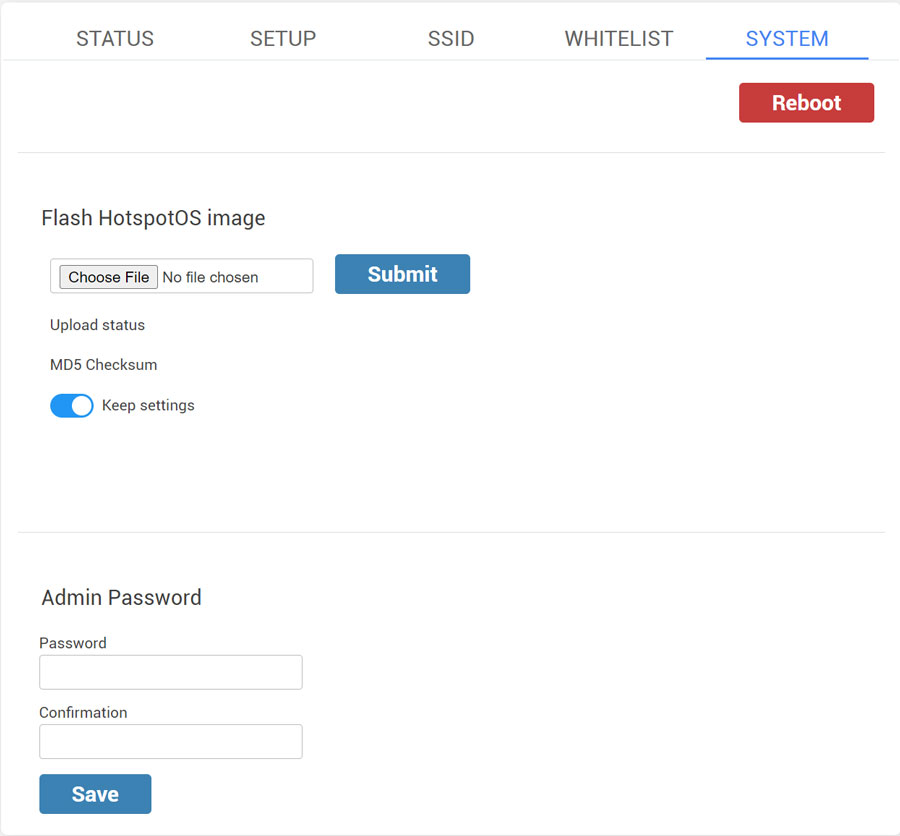
From the System tab, you can flash HotspotOS image and change the Admin password.
When you finish setup, restart the AP / WiFi router to apply changes.
AVM FRITZ! HotspotOS Download
AVM FRITZ!Box 4020
Download HotspotOS
Installation via EVA:
In the first seconds after power is connected, the bootloader will listen for FTP connections on 169.254.157.1 (Might also be 192.168.178.1).
Firmware can be uploaded like following:
ftp> quote USER adam2
ftp> quote PASS adam2
ftp> binary
ftp> debug
ftp> passive
ftp> quote MEDIA FLSH
ftp> put hotspotos-ath79-generic-avm_fritz4020-squashfs-sysupgrade.bin mtd1
Note that this procedure might take up to two minutes. After transfer is complete you need to powercycle the device to boot HotspotOS.
AVM FRITZ!WLAN Repeater 300E
Download HotspotOS
To install HotspotOS via EVA bootloader, a FTP connection need to be established to 192.168.178.1 within the first seconds after power on:
ftp> quote USER adam2
ftp> quote PASS adam2
ftp> binary
ftp> debug
ftp> passive
ftp> quote MEDIA FLSH
ftp> put hotspotos-ath79-generic-avm_fritz300e-squashfs-sysupgrade.bin mtd1
AVM FRITZ!Repeater 1200
Download sysupgrade HotspotOS
1. Grab the uboot for the Device from the ‘u-boot-fritz1200’ subdirectory. Place it in the same directory as the ‘eva_ramboot.py’ script. It is located in the ‘scripts/flashing’ subdirectory.
2. Assign yourself the IP address 192.168.178.10/24. Connect your Computer to one of the boxes LAN ports.
3. Connect Power to the Box. As soon as the LAN port of your computer shows link, load the U-Boot to the box using the following command.
> ./eva_ramboot.py –offset 0x85000000 192.168.178.1 uboot-fritz1200.bin
4. The U-Boot will now start. Now assign yourself the IP address 192.168.1.70/24. Copy the HotspotOS initramfsimage to a TFTP server root directory and rename it to ‘FRITZ1200.bin’.
5. The Box will now boot HotspotOS from RAM. This can take up to two minutes.
6. Copy the U-Boot and the HotspotOS sysupgrade (!) image to the Box using scp. SSH into the Box and first write the Bootloader to both previous kernel partitions.
> mtd write /path/to/uboot-fritz1200.bin uboot0
> mtd write /path/to/uboot-fritz1200.bin uboot1
7. Remove the AVM filesystem partitions to make room for our kernel + rootfs + overlayfs.
> ubirmvol /dev/ubi0 –name=avm_filesys_0
> ubirmvol /dev/ubi0 –name=avm_filesys_1
8. Flash HotspotOS peristently using sysupgrade.
> sysupgrade -n /path/to/hotspotos-sysupgrade.bin
AVM FRITZ!Box 4040
Download sysupgrade HotspotOS
0. It’s highly recommended to connect to the serial port. The serial settings are listed above.
1. install a u-boot image for AVM Fritz!Box 4040 (see <https://github.com/chunkeey/FritzBox-4040-UBOOT/releases> and <https://github.com/chunkeey/FritzBox-4040-UBOOT/blob/master/upload-to-f4040.sh>)
2. upload the initramfs.itb image via tftp (u-boot listens to 192.168.1.1 – use binary transfer mode!)
3. connect to the FB4040 and use HotspotOS sysupgrade.bin to install the image.
AVM FRITZ!Box 7530
Download sysupgrade HotspotOS
1. Grab the uboot for the Device from the ‘u-boot-fritz7530’ subdirectory. Place it in the same directory as the ‘eva_ramboot.py’ script. It is located in the ‘scripts/flashing’ subdirectory.
2. Assign yourself the IP address 192.168.178.10/24. Connect your computer to one of the boxes LAN ports.
3. Connect Power to the Box. As soon as the LAN port of your computer shows link, load the U-Boot to the box using the following command.
> ./eva_ramboot.py –offset 0x85000000 192.168.178.1 uboot-fritz7530.bin
4. The U-Boot will now start. Now assign yourself the IP address 192.168.1.70/24. Copy the HotspotOS initramfs (!) image to a TFTP server root directory and rename it to ‘FRITZ7530.bin’.
5. The Box will now boot HotspotOS from RAM. This can take up to two minutes.
6. Copy the U-Boot and the HotspotOS image to the Box using scp. SSH into the Box and first write the Bootloader to both previous kernel partitions.
> mtd write /path/to/uboot-fritz7530.bin uboot0
> mtd write /path/to/uboot-fritz7530.bin uboot1
7. Remove the AVM filesystem partitions to make room for our kernel + rootfs + overlayfs.
> ubirmvol /dev/ubi0 –name=avm_filesys_0
> ubirmvol /dev/ubi0 –name=avm_filesys_1
8. Flash HotspotOS peristently using sysupgrade.
> sysupgrade -n /path/to/hotspotos-sysupgrade.bin
AVM FRITZ!Repeater 3000
Download sysupgrade HotspotOS
1. Grab the uboot for the Device from the ‘u-boot-fritz3000’ subdirectory. Place it in the same directory as the ‘eva_ramboot.py’ script. It is located in the ‘scripts/flashing’ subdirectory.
2. Assign yourself the IP address 192.168.178.10/24. Connect your computer to one of the boxes LAN ports.
3. Connect Power to the Box. As soon as the LAN port of your computer shows link, load the U-Boot to the box using following command.
> ./eva_ramboot.py –offset 0x85000000 192.168.178.1 uboot-fritz3000.bin
4. The U-Boot will now start. Now assign yourself the IP address 192.168.1.70/24. Copy the OpenWRT initramfs (!) image to a TFTP server root directory and rename it to ‘FRITZ3000.bin’.
5. The Box will now boot OpenWRT from RAM. This can take up to two minutes.
6. Copy the U-Boot and the OpenWRT sysupgrade (!) image to the Box using scp. SSH into the Box and first write the Bootloader to both previous kernel partitions.
> mtd write /path/to/uboot-fritz3000.bin uboot0
> mtd write /path/to/uboot-fritz3000.bin uboot1
7. Remove the AVM filesystem partitions to make room for our kernel + rootfs + overlayfs.
> ubirmvol /dev/ubi0 –name=avm_filesys_0
> ubirmvol /dev/ubi0 –name=avm_filesys_1
8. Flash OpenWRT peristently using sysupgrade.
> sysupgrade -n /path/to/openwrt-sysupgrade.bin
AVM FRITZ!Box WLAN 3370 rev2 – Micron
Download EVA kernel HotspotOS
Download EVA filesystem HotspotOS
Download sysupgrade HotspotOS
EVA FTP install/recovery
Connect host LAN cable to FritzBox LAN port and establish serial connection (optional).
– set your host IP to 192.168.178.x (subnet 255.255.255.0)
– open a Terminal in the directory where the files to flash are
– power on FRITZ!Box
– establish an FTP connection within 5 seconds to 192.168.178.1
ftp -n 192.168.178.1
Serial (optional): interrupt boot pressing a key, when Eva_AVM > appears in a Serial Port Terminal (e.g. GtkTerm) opened as root user
Type the following FTP commands – ❗ some boxes seem to reboot after 30s – see commit, so be quick → copy/paste f.e. with a Clipboard Manager → firmware flashing is done within a few seconds
If something goes wrong → do not panic → try again – bootloader is not touched.
ftp> quote USER adam2
ftp> quote PASS adam2
ftp> binary
ftp> debug
ftp> passive
ftp> quote SETENV linux_fs_start 0
ftp> quote MEDIA FLSH
ftp> put /path/to/hotspotos-lantiq-xrx200-avm_fritz3370-rev2-micron-squashfs-eva-kernel.bin
ftp> put /path/to/hotspotos-lantiq-xrx200-avm_fritz3370-rev2-micron-squashfs-eva-filesystem.bin
mtd0
ftp> quote REBOOT
ftp> quit
AVM FRITZ!Box WLAN 3370 rev2 – Hynix
Download EVA kernel HotspotOS
Download EVA filesystem HotspotOS
Download sysupgrade HotspotOS
EVA FTP install/recovery
Connect host LAN cable to FritzBox LAN port and establish serial connection (optional).
– set your host IP to 192.168.178.x (subnet 255.255.255.0)
– open a Terminal in the directory where the files to flash are
– power on FRITZ!Box
– establish an FTP connection within 5 seconds to 192.168.178.1
ftp -n 192.168.178.1
Serial (optional): interrupt boot pressing a key, when Eva_AVM > appears in a Serial Port Terminal (e.g. GtkTerm) opened as root user
Type the following FTP commands – ❗ some boxes seem to reboot after 30s – see commit, so be quick → copy/paste f.e. with a Clipboard Manager → firmware flashing is done within a few seconds
If something goes wrong → do not panic → try again – bootloader is not touched.
ftp> quote USER adam2
ftp> quote PASS adam2
ftp> binary
ftp> debug
ftp> passive
ftp> quote SETENV linux_fs_start 0
ftp> quote MEDIA FLSH
ftp> put /path/to/hotspotos-lantiq-xrx200-avm_fritz3370-rev2-hynix-squashfs-eva-kernel.bin
ftp> put /path/to/hotspotos-lantiq-xrx200-avm_fritz3370-rev2-hynix-squashfs-eva-filesystem.bin
mtd0
ftp> quote REBOOT
ftp> quit
AVM FRITZ!Box 7360SLx
COMING SOON!
1. Download HotspotOS image
2. Use FTP in order to enter the bootloader:
ftp 192.168.178.1
After the connection was successfully established use as Name: adam2 and Password: adam2
3. Set type:
bin
4. Set passive mode:
passiv
5. Set media:
quote MEDIA FLSH
6. Use the downloaded HotspotOS image file:
put hotspotos-lantiq-lantiq-xrx200-avm_fritz7360sl-squashfs-sysupgrade.bin
7. When it’s finished:
exit
After HotspotOS ist flashed, the FRITZ!Box-IP will change to 192.168.1.1. You should NOT erase mtd3 and mtd4.
* While flashing OpenWrt via ADAM2, you should drive a session like in the code box:
ftp 192.168.178.1
Connected to 192.168.178.1.
220 ADAM2 FTP Server ready
Name (192.168.178.1:unknown): adam2
331 Password required for adam2
Password:
230 User adam2 successfully logged in
Remote system type is AVM.
ftp> bin
200 Type set to BINARY
ftp> passiv
Passive mode on.
ftp> quote MEDIA FLSH
200 Media set to MEDIA_FLASH
ftp> put hotspotos-lantiq-xrx200-avm_fritz7360sl-squashfs-sysupgrade.bin mtd1
local: hotspotos-lantiq-xrx200-avm_fritz7360sl-squashfs-sysupgrade.bin remote: mtd1
227 Entering Passive Mode (192,168,178,1,12,15)
150 Opening BINARY data connection
226 Transfer complete
5243074 bytes sent in 10.39 secs (492.8278 kB/s)
ftp> exit
221 Thank you for using the FTP service on ADAM2
* After flashing you can powercycle the device
AVM FRITZ!Box 7362SL
Download sysupgrade HotspotOS
FRITZ!Box typically uses 192.168.178.1 as the default IP in the bootloader. If the device doesn’t respond, try with 192.168.1.1.
Assign a static IP in the 192.168.178.x range (e.g. 192.168.178.100) to your PC (192.168.1.x if the device uses 192.168.1.1 as its default IP).
Ideally, place a switch in between the router and your client (this slightly widens your FTP flashing window).
Power on your device and use scripts/flashing/eva_ramboot.py to send initramfs-kernel.bin to the router. The router will then boot into HotspotOS: python3 /path/to/eva_ramboot.py 192.168.178.1 /path/to/hotspotos-lantiq-xrx200-avm_fritz7362sl-initramfs-kernel.bin
Blinking red power LED indicates that HotspotOS is running in recovery mode.
Set an IP address in 192.168.1.x range on your PC, or enable DHCP.
Transfer the sysupgrade image to the /tmp directory of the router using scp and run sysupgrade.
First boot might take a bit longer if linux_fs_start was set to 1. In that case the device will reboot twice, first time it will fail to load second kernel (overwritten by ubifs), set linux_fs_start to 0 and reboot.
Installation via FTP:
1. Use scripts/flashing/eva_ramboot.py to send initramfs-kernel.bin to the device when powering on.
Standard AVM procedures with finding the correct IP address and the right moment to open FTP apply here (approx. 4 seconds on 7362SL).
IMPORTANT: set lzma compression in ramdisk options, bootloader stalls when receiving uncompressed images.
2. Transfer sysupgrade.bin image with scp to /tmp directory and run sysupgrade
3. First boot might take a bit longer if linux_fs_start was set to 1, in that case the device will reboot twice, first time it will fail to load second kernel (overwritten by ubifs), set linux_fs_start to 0 and reboot.
HotspotOS uses the entire NAND flash. Kernel uses 4 MiB and rootfs uses the rest of 124 MiB, overwriting everything related to FRITZ!OS – both OS images, config and answering machine/media server data. To return to FRITZ!OS, use AVM’s recovery image.
AVM FRITZ!Box 7412
Download sysupgrade HotspotOS
Use the eva_ramboot.py script to load an initramfs image on the device. Run it a few seconds after turning the device on.
$ scripts/flashing eva_ramboot 192.168.178.1 bin/targets/lantiq/xrx200/openwrt-lantiq-xrx200-avm_fritz7412-initramfs-kernel.bin
If it fails to find the device try the ip address 169.254.120.1.
(Firmware updates or the recovery tool apparently change it.)
IMPORTANT: set lzma compression in ramdisk options, bootloader stalls when receiving uncompressed images.
The device will load it in ram and boot it. You can reach it under the openwrt default ip address 192.168.1.1.
Check if the key linux_fs_start is not set to 1 in tffs:
$ fritz_tffs_nand -d /dev/mtd1 -n linux_fs_start
If it is set to 1, the bootloader will select the wrong set of partitions. Restart the box and install an FritzOS upgrade or do a recovery. Afterwards start again at step 1.
Run sysupgrade to persistently install HotspotOS.