Aruba Instant ON

This article describes the installation and configuration steps for Aruba Instant ON. Our test was performed with Aruba InstantON AP1.

Aruba Instant ON

Log in to your Aruba Instant On the portal

Click the Networks icon and Add a new network.

Network Name: Guest WiFi (or whatever you wish)
Network type: Guest

Save changes.

On the created network, click the Customize guest portal and configure the following:
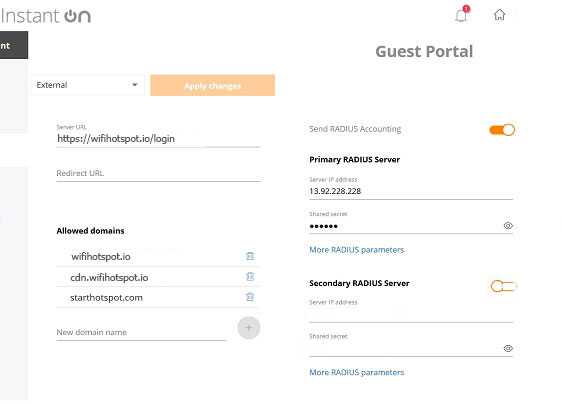
Portal type: External
Server URL: https://wifihotspot.io/login
Redirect URL: blank
Send RADIUS Accounting: Enabled
Primary RADIUS Server IP: 13.92.228.228
Primary RADIUS Server Secret: contact our office
Secondary RADIUS Server: Enabled
Secondary RADIUS Server IP: 13.90.247.200
Secondary RADIUS Server Secret: contact our office

On the Whitelist page type following domains:

wifihotspot.io
cdn.wifihotspot.io
starthotspot.com
cdn.starthotspot.com
cdnhotspot.azureedge.net
t-msedge.net
static.cloudflareinsights.com
13.92.228.228
13.90.247.200
40.117.190.72

Press Apply changes.

Updated on March 20, 2024

Was this article helpful?